Diablo
Diablo 3 Area Damage Explained – Maxroll.gg – Diablo 3 Guides
Jul
As of the latest update, which took place on the enchanting day of May 21st, 2023, the information has been refreshed.
[Latexpage].
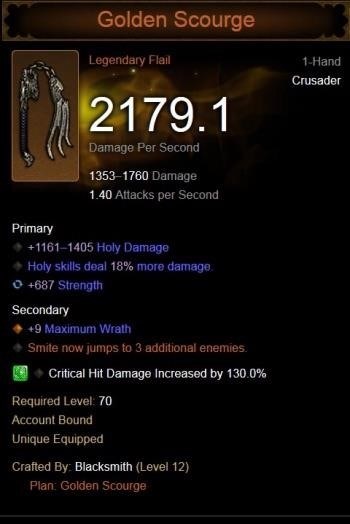
appropriate reroll? Intelligence into %Damage or AD
Area Damage (AD) stands as an invaluable primary attribute, elevating damage output to new heights. Yet, amidst its power, lies a labyrinth of complexity and bewilderment within the realm of Diablo III. This guide endeavors to unravel the enigmatic mechanics of Area Damage, dispelling misconceptions that plague the community, while illuminating a universal framework for assessing its worth in shaping your character’s destiny.
Input: The Aether Walker, found on the right hand, is an item that we will inevitably come across. It poses an intriguing question: Should we prioritize rolling Intelligence into %Damage or Area Damage? Sadly, the answer is not straightforward; one must delve into the mechanics of abilities that trigger Area Damage, how this damage spreads, and how we can strategically position monsters to maximize its effect.
Let’s dive into the fascinating world of the LoD Hydra Wizard Build, a perfect example to explore the intricate workings of Area Damage and delve deeper into the matter at hand. We will closely examine two planners, both of which are identical except for their Serpent’s Sparker. The Area Damage planner, located on the left, boasts an impressive 275% legendary affix for Area Damage on its weapon. On the other hand, the Damage planner, situated on the right, showcases a legendary affix of 300% for %Damage on its weapon.
Rewritten In order for an ability to trigger Area Damage on a damage instance, it only requires one thing: the skill must have a proc coefficient that is not equal to 0. Abilities with a proc coefficient of 0 cannot create Area Damage instances, but the actual value of the proc coefficient has no further impact on AD as long as it is greater than 0. Interestingly, Hydra possesses a proc coefficient greater than 0 for all its runes, making the skill eligible to trigger Area Damage. However, any Hydra summoned by a Legacy Etched Sigil, commonly known as non-selfcasted instances, will always have a proc coefficient of 0.
In the realm of Diablo III, there exists a well-known pattern and rule of thumb (“procs can not proc procs”). This concept is further elaborated upon in the upcoming guide titled “Proc Coefficients Explained”. As a result of this principle, any Hydra summoned through the use of Etched Sigil during a Greater Rift will not benefit from 174% Area Damage (or 150% in some cases), unlike the Hydra that is casted upon oneself. This discrepancy poses a significant challenge, particularly for inexperienced players who may unknowingly hinder their overall damage output by simply relying on Arcane Torrent. The optimal strategy involves casting Hydra on oneself twice and subsequently channeling for a continuous duration of 15 seconds, as pre-existing Hydras are not overwritten by Etched Sigil.
Rewritten Let’s pause for a moment and simplify the situation. One common dilemma is choosing between a 10% Damage or 24% Area Damage roll on a weapon. Let’s imagine hitting 20 targets with each of these weapon rolls. In the first scenario, you’ll deal 110 damage to each of the 20 targets with 150% Area Damage, which we’ll refer to as T’. In the second scenario, you’ll deal 100 damage to each of the 20 targets with 174% Area Damage, referred to as T”. In both cases, there is a 20% chance that each hit on a target will trigger Area Damage on the 19 other nearby targets.

In essence, this demonstration effectively highlights the superiority of an extra 24% Area Damage over a mere 10% Damage when striking a concentrated group of 20 targets with a 150% Area Damage.
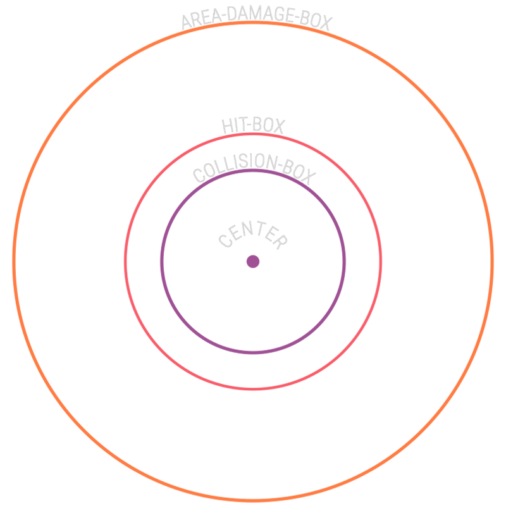
xy-planeInput: In order to fully grasp the mechanics of Area Damage propagation and optimize it according to one’s playstyle, it is crucial to comprehend the four distinct boxes that encompass a monster and master the art of manipulating them.
All calculations in Diablo III that involve distances “within X yards” are based on a sphere centered around a specific point. Despite the fact that the game defines an actor’s position using three-dimensional coordinates (x, y, z), these calculations only take into account the distances in the xy-plane and completely ignore the z-axis. However, there is one exception to this rule – the Slow Time ability creates a three-dimensional sphere for its visual effect. It’s important to note that there may be other exceptions, but this is the most noticeable one for the majority of players. In all other cases, the “within X yards” mechanic is simplified into a two-dimensional circle in the xy-plane. This simplification fortunately saves me a lot of time when creating the figures for this game. The center of a monster, denoted as m, is defined by its xy-position (Pxym), which also coincides with the center of its Hit Box.
The Hit Box for a monster m (refer to Figure 1) is consistently centered at Pxym. It is always represented as a flawless circular shape with a predetermined radius rH, measured in yards. The selection of rH is a deliberate choice determined by the visual dimensions of the monster’s model. Although these values can be extracted from data for each model, there is currently no accessible database offering this specific information to the public. Scaling rH is not possible within the game mechanics, as it remains a fixed value unique to each monster model.
By definition, a monstrous entity sustains injury solely when its Hit Box intersects with the region of a damaging event. Consequently, it can be inferred that all instances of harm essentially represent “a spatial expanse with limitless forms”; the prevailing configurations being the most frequently encountered.
In no way is this an exhaustive compilation; rather, it offers a swift glimpse into the diverse forms employed by the game to efficiently calculate hits. Certain abilities possess alternate configurations, like the formidable Crippling Wave, yet its intricacies lie beyond the purview of this guide.
At this juncture, it is imperative for us to grasp that Area Damage operates within an xy-circle encompassing the primary target it activates upon. Consequently, the Hit Box of the primary target holds no significance in terms of Area Damage’s damage range and overall impact.
The monster’s Collision Box (refer to Figure 1) is represented as a circle for clarity, but it can actually take on any shape. It is not an exact replica of the monster’s model, but rather a strategically simplified form used to efficiently determine if a collision occurs. To achieve computational efficiency, game engines often simplify the Collision Box to a rectangular or spherical bounding box surrounding the actor, as these shapes allow for efficient collision calculations.
The actor’s Collision Box is not static like its Hit Box; it can change dynamically. An example that is easy to understand is Spirit Walk or Illusory Boots, where both completely disable your character’s Collision Box when active, often referred to as “Phase Walking” in gaming. Some monsters, like Vile Swarms, Enraged Phantom, or Shade Stalker, have no Collision Box at all, allowing them to be densely stacked together until their centers Pxy have the same values. Certain monsters can temporarily disable their Collision Box, mostly to facilitate their movement abilities (such as Winged Assassins or Executioners), so they don’t have to push away other actors in their target location.
Collision Boxes, regardless of their unique shapes, exist as intricate xyz-meshes in three dimensions. The crucial concept to grasp here is that once two entities, such as the monstrous beings m1 and m2, possess colliding Collision Boxes, the manipulation of their centers Pxym1 and Pxym2 to bring them closer together becomes an impossibility.
| Box | Static/Dynamic | Shape | Size |
| Center | dynamic | xyz-point |
– |
| Collision | dynamic | xyz-mesh |
variable |
| Hit | static | xy-circle |
fixed value per model |
| Area Damage | static | xy-circle |
10 yards |
The table presented above serves as a concise summary of our current knowledge. In an ideal realm, possessing boundless computational capabilities, each Hit Box would precisely mirror the parallel projection of the Collision Box onto the xy-plane. However, as mentioned, this is an impractical notion, hence leading to misalignment between certain monsters’ models, Collision Boxes, and Hit Boxes.
Death Maiden serves as a prime illustration in this regard; those who have experienced playing zMonk are well acquainted with the frustration of being teleported incessantly, despite never intentionally “targeting” her. Death Maiden exemplifies a scenario where the Collision Box dwarfs both the model and the Hit Box. Conversely, Voracity presents a contrasting scenario: an outrageously oversized Hit Box accompanied by a Collision Box so minuscule that one’s character can seemingly occupy the physical space inside Voracity’s model, even without donning Illusory Boots.
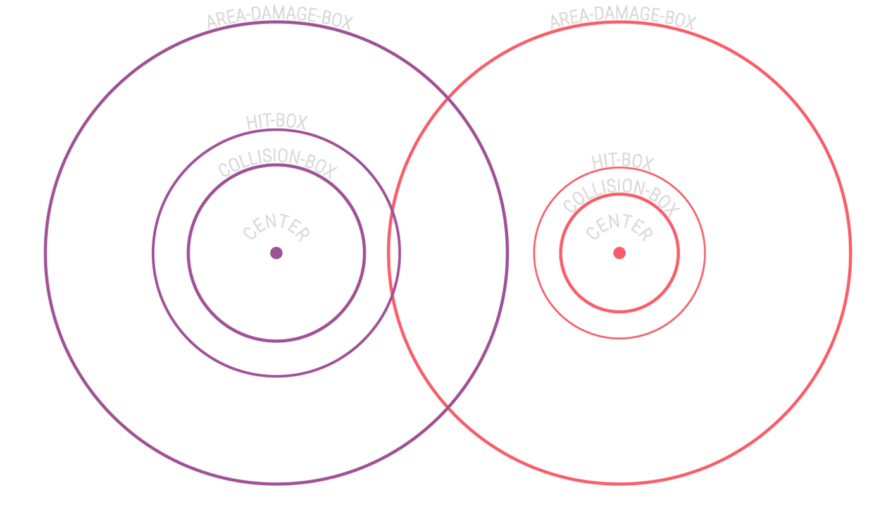
In Figure 2, we are presented with an intriguing outcome that arises from Area Damage functioning as a damage instance in the form of an xy-circle surrounding the primary target’s center. Let’s imagine that our primary target is a formidable monster called m1, upon which we activate Area Damage. Surprisingly, the resulting Area Damage Instance does not interfere with m1’s Hit Box, which belongs to a smaller monster. Consequently, no secondary target experiences additional damage from Area Damage. However, if we were to reverse the scenario and designate m2 as our primary target, the resulting Area Damage Instance would intersect with m1’s Hit Box, causing damage to it as a secondary target.
At this juncture, it is abundantly evident that the crucial factor in scaling Area Damage is density. The ultimate goal is to ensure that when Area Damage is activated on a primary target, it is able to strike as many secondary targets as possible. Our previous section taught us that the size of the Hit Box of a primary target is irrelevant, whereas larger Hit Boxes on secondary targets can enhance the overall damage output by offering more area for impact. However, it is disheartening to note that the radius rH of each Hit Box remains fixed and does not adapt to any interactions within the game.
In terms of manipulation, our focus now lies solely on the arrangement of monsters in relation to one another. The more concentrated the targets are at their centers, the greater our Area Damage output becomes. This implies that the limiting factor we face is the Collision Box of each individual target. It is already known that certain monsters possess the ability to temporarily disable their Collision Box, particularly when utilizing a moving skill (such as Winged Assassins, Executioners, Punishers, and others). Fortunately, within the game, we have a selection of abilities that grant us the power to disable a monster’s Collision Box at our own discretion, enabling us to position them as densely as desired.
Behold the image above (use the slider) unveiling the magnificent Pixelpull phenomenon. Witness the awe-inspiring Energy Twister paired with Ranslors Folly, seamlessly drawing the entire screen into a single mesmerizing force. Brace yourself for the explosive power of these electrifying pulls, as Area Damage reaches unimaginable heights. Yet, not all displacement abilities possess the ability to create such pixel density. Take, for instance, Cyclone Strike, which may displace multiple monsters, but alas, the Collision Box of each displaced target remains active. In conclusion, only a select few skills and item combinations hold the power to achieve the mystical art of pixelpulling.
Press F in honor of our noble brethren, the agile Monk and the fierce Demon Hunter, who unfortunately lack the ability to perform pixelpulls. Masterfully executed pixelpulls play a vital role in dominating the 4-Man Push METAs, serving as a crucial element in conquering the highest levels of Greater Rifts, particularly in the realm of competitive play. It is important to remember that constantly displacing monsters will gradually build their resistance to crowd control, eventually rendering them immune to any further manipulation. Thus, it is impossible to perpetually pixelate a pixelpull.
Let’s delve into the inner workings of Area Damage in this section, where we’ll provide a concise overview. The primary target, which triggers the Area Damage effect, and the secondary target, which is struck by the resultant Area Damage Instance, are the key players. Here are the fundamental principles that govern the phenomenon of Area Damage:
Exploring the Art of Damage CalculationIf we delve into the realm of scaling Area Damage, we must closely examine the intricate world of total damage calculation. Imagine a scenario where you unleash an Area of Effect (AoE) ability, like the mighty Energy Twister, upon a group of t-many targets. Equipped with y Area Damage, each tick of our Energy Twister inflicts a precise s amount of damage. These targets are perfectly aligned within a 10-yard radius, creating a mesmerizing pixelpull. With each strike, there is a 20% chance per target to trigger an Area Damage proc, resulting in an impressive t ÷ 5 number of AD procs. Each AD proc then spreads its damage value y ⋅ s to t-1 additional targets. When all is said and done, this intricate process yields an extraordinary outcome.


The main point to take away from this is that the initial Sparker, equipped with a 10% Damage boost and a 300% affix, will consistently outperform the second Sparker, even if it has a slightly higher damage increase of at least 1.1%, regardless of the number of targets hit. However, what if we find ourselves in the second scenario? Only if the result of (x ⋅ d) ÷ (d + y) is less than or equal to 1, then there exists a natural number t0 where the AD-item surpasses the DPS-item when hitting more than t0 targets in a pixelpull. Let’s revisit our Hydra situation and make a slight alteration. Let’s say the second Serpent’s Sparker for the Area Damage setup has an Affix of 295% with an additional 24% Area Damage, resulting in x = (4 ÷ 3.95) ⋅ 1.1 ≈ 1.1139. Now, let’s plug it in and see if we find ourselves in scenario (2).

Starting from 10 targets, the Area Damage Sparker triumphs over the %Damage one. Nevertheless, when it comes to a lone target, such as certain Rift Guardians, the %Damage Sparker unleashes approximately 1.1139 times more damage. Whether or not you choose to make this particular trade-off is entirely in your hands. Typically, if your build thrives with Area Damage, you are willing to make this trade-off, as the challenging part lies within the Rift itself, while the additional time spent on the Rift Guard greatly benefits from Bane of the Stricken.
Limit Proof
Target Proof
Thank you to Iria#1342 for catching a reversed sign in the target proof, a minor notation mistake in both proofs, and a neglected cancellation in the limit proof. Authored by sVr. Revised by Chewingnom.