Diablo
Diablo 3 Season 28 Jade Harvester Witch Doctor Guide

Jul
The latest update was made on the enchanting day of May 21st, 2023.
The Jade Harvester’s attire emerged as a pinnacle Witch Doctor archetype upon the arrival of the Reaper of Souls. Exhibiting an unparalleled flair, it revolves around the art of reaping Damage over Time (DoT) abilities to unleash instantaneous havoc.
Haunt, when skillfully combined with Soul Harvest, unleashes an enthralling display of power, devouring the residual damage-over-time inflicted on adversaries in an instant. The potency of these effects is elevated to unprecedented levels through the synergistic interplay of Creeping Death and Quetzalcoatl.
These days, the Witch Doctor build may not be considered one of the strongest, but it holds a rich legacy as one of the game’s most formidable sets even before the introduction of seasons. In the past, it played a crucial role in T6 farming, thanks to its immense burst damage capabilities that allowed for the swift elimination of Elites using Soul Harvest, and the efficient dispatching of Rift Guardians with the assistance of Legacy The Furnace and its Crushing Blow ability.
Throughout its evolution, the Witch Doctor build has gradually lagged behind others. However, recent updates have injected newfound strength and injected a vibrant playstyle. One notable enhancement is the empowering of Haunt, granting it the capacity to inflict additional damage upon reapplication. Consequently, Haunt has transformed into a relentless and easily deployable offensive ability.
Welcome to the world of the Area Damage (AD) build, where Jade (2) & (6) Bonuses work their magic. The Jade Harvester in its present state offers a playable experience with two enticing options: Cold for quicker setup or Poison for greater damage output. As we ascend the Jade leaderboards, Poisoned Spirit tends to dominate, but don’t underestimate the efficiency of Resentful Spirits for speedy pulls and productive farming. Below, you’ll discover both variations. Let the journey begin!
Bursting with flavor ✔Uniquely captivating playstyle ✔Unleashes explosive AoE devastation ✔Unleashes lightning-fast bursts of destruction ✔.
❌ Limited Mobility❌ Fragile Build❌ Lengthy Preparation Time❌ Demands Skill.
Items.
In Season 28, a mesmerizing new feature called the Altar of Rites emerges, offering boundless powers to your entire account in exchange for daring sacrifices. Embark on a journey of farming bounties, slaying Ubers, crafting the mystical Staff of Herding, and more. Conquer all 26 tasks, and surrender 6 Primal Ancients to unlock unimaginable benefits such as unparalleled Damage, Defense, Quality of Life enhancements, enhanced drops, 3 potent Potion Super Powers, and the tantalizing Wings of Terror. Dive into the comprehensive guides on Unlocking the Altar and its intricate Mechanics, crafted by the brilliant minds of Raxxanterax and Chewingnom, to unveil the secrets of this extraordinary Season!
Note: The suggested path assumes you are playing Solo and used the Challenge Rift Cache to help you level up.
Embrace Node 2: Opt for the Divine Blessing and unlock a magnificent array of 70 yellow treasures spanning across levels 18 to 70!
Node 6: Hasten your pace to acquire twin Bounties, aiding in the unlocking of various Nodes within the Altar.
Venture into the mystical realm of Nodes 7-14, the final frontier for acquiring newfound power before the grand reset of the Challenge Rift. Embark on a path of discovery, ensuring to claim a single Node at the base of each route to unveil the hidden potential of the sacred Potion Super Powers. Ascend to the zenith and claim the elusive Mirror Node, bestowing upon you an astounding 41% surge in experience throughout the entire season. Do not forget to liberate Father, an enigmatic figure awaiting your triumph over the formidable GR70 solo and the acquisition of your inaugural Primal relic!
Ascend through nodes 15-26, embracing the ultimate essence of Quality of Life, Damage, and Defense. Let these sacred nodes intertwine to complete the magnificent Altar.
Unleash the Potion’s Mighty Abilities: Begin with the Patriarch, then the Matriarch, and lastly the Mortal.
Please note that the Mortal and Mother Potions can be obtained by salvaging 2 and 3 Primals respectively. Waste no time and unlock these potions once you possess the necessary materials, as they come with no cost at all!
Use the Scroll Bar to see Altar Progression
Jade (6) Bonus Soul Harvest Nuke
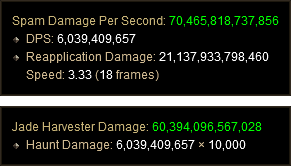
Input: Due to the Raiment of the Jade Harvester (2) Bonus Attack Speed does matter and we want to reach certain Breakpoints. The faster we can spam Haunt on enemies, the more often the damage from the (2) Bonus will be applied. In speedruns with 5 Echoing Fury stacks we reach the 18 frames Breakpoint. For the push setup we can remain at way lower Breakpoints around the 28 frames mark without needing any Attack Speed rolls on our gear.The importance of Attack Speed cannot be underestimated when it comes to the Raiment of the Jade Harvester (2) Bonus. Our goal is to reach specific Breakpoints in order to maximize the effectiveness of Haunt against enemies. By increasing our Attack Speed, we can spam Haunt more frequently, resulting in more instances of damage from the (2) Bonus being applied. During speedruns, achieving 5 Echoing Fury stacks allows us to reach the coveted 18 frames Breakpoint. However, for the push setup, we
Strive to maximize the potency of your Area Damage, enabling you to unleash an explosive torrent of destruction through the Raiment of the Jade Harvester’s (6) Bonus. Both the (2) and (6) Bonuses of the Jade Harvester are capable of triggering Area Damage. Additionally, acquiring additional Cooldown Reduction will prove invaluable, allowing for more frequent utilization of Spirit Walk.
Assembling the Build
Item Stat Priorities
Gems
Skills
Passives
Paragon Points
Follower
Gameplay
Hardcore
In this setup that emphasizes quickness, we employ the power of Echoing Fury to greatly enhance our attacking speed. By incorporating Haunting Girdle and Resentful Spirits, we are able to unleash three Haunts simultaneously, resulting in a rapid infliction of damage over time onto our enemies.
In the game, strive for speed and maintain your toughness enhancements while staying alert to Elite affixes, ensuring the continuous power of Squirt’s Necklace for maximum damage. Don’t forget to keep up your Soul Harvest and Horrify Frightening Aspect buffs. When encountering Elites, gather together and utilize Spirit Walk frequently to enjoy unrestricted movement. Unleash Haunt, Big Bad Voodoo, and Soul Harvest, unleashing their full potential after using Piranhas Piranhado to create a powerful pull.
For those seeking to conquer the depths of low Greater Rift levels, one intriguing approach is to incorporate Wormwood into your arsenal. This mystical weapon effortlessly inflicts Locust Swarm upon your adversaries as you gracefully traverse through their midst. Furthermore, by harnessing the power of the Raiment of the Jade Harvester (6) Bonus, you can magnify the potency of Soul Harvest, effectively amplifying the destructive force of its damage over time.
Choose the Version to Construct.
The core idea revolves around the configuration outlined in the primary segments of the manual. Soul Harvest ought to possess a minimal cooldown, which can be further diminished through Grave Injustice and the Raiment of the Jade Harvester (4) Bonus.
Maintain a constant state of terror and fear by keeping your Horrify Frightening Aspect and Soul Harvest buffs active at all moments. Gather large groups of enemies and tightly group them together using Piranhas Piranhado for maximum Area Damage. Cast Haunt and Soul Harvest as frequently as possible to fully utilize the benefits of the Raiment of the Jade Harvester (2) Bonus and Raiment of the Jade Harvester (6) Bonus. Constantly maneuver and evade attacks due to the low toughness of this build, and take advantage of the buffs provided by the Oculus Ring whenever available. Ideally, engage enemies with Spirit Walk to quickly eliminate them.
Enhance your resilience by swapping out Ring of Royal Grandeur and Captain Crimson’s Trimmings with Unity and Haunting Girdle. For a more aggressive approach, consider replacing Horrify with the mighty Big Bad Voodoo Slam Dance or the ethereal Ghost Trance.
Gameplay.
With our incredible Echoing Fury, Big Bad Voodoo, and Spirit Walk uptime, we unleash mayhem upon our foes, thanks to our relentless slaughter of enemies fueled by Grave Injustice. Although Soul Harvest can be spammed, this build regrettably falls short in the area of area-of-effect damage. To achieve optimal damage output, continuously haunt our adversaries to trigger the Raiment of the Jade Harvester (2) Bonus. Employ Spirit Walk judiciously to unleash a devastating burst of damage with the aid of Shukrani’s Triumph.
Creeping Death
Raiment of the Jade Harvester + Haunt
Shukrani’s Triumph
Piranhas Piranhado
Gruesome Feast
Playing this build is an enjoyable experience, although it falls short in terms of damage when compared to powerful builds like the Mundunugu Witch Doctor. However, with a little boost to its distinctive playstyle, it has the potential to become a game-changer in the META of various groups. Let’s raise a toast to that!
Input: Introduction by Chewingnom. Guide by Rob with help from wudijo. Updated by Chewingnom.Chewingnom’s introduction sets the stage, while Rob, with the assistance of wudijo, serves as the guiding force. The latest updates have been seamlessly incorporated by Chewingnom.