Game
How To Put A Chest On A Horse In Minecraft? Step-By-Step Guide
Jun

Have you ever wanted to put a chest on your trusty steed in Minecraft? With this step-by-step guide, you’ll soon be able to equip your horse with all the gear they need. It sounds easier than getting started, doesn’t it?
Can you imagine being able to store various helpful tools and goodies while traveling around the world in Minecraft, making it much simpler? Are you ready to take your gaming experience in Minecraft up a notch by riding your horse? This guide will show you just how easy it is to do that.
Continue reading – we have everything you require! Then, if you’re seeking an escapade or just desire greater convenience in your gaming experience, I am going to dissect each stage for you. You won’t encounter any difficulty in following these guidelines.
To put an empty hand on a chest, attach it to the selected animal’s left trigger (or right-click it in the inventory access space) while the donkey/mule is empty-handed. In Minecraft, tame a mule or donkey by repeatedly left-triggering particles of love until it shows affection. Then, place a chest on the horse to store items.
Related: What is the Most Uncommon Flower in Minecraft?
The Need For Chest On A Horse In Minecraft
Do you want to add more storage space to your Minecraft horse by equipping a chest on its chest? This is the way to go, where a guide will walk you through how to gather the necessary materials, as well as provide details about saddling and taming a horse.
In Minecraft, players are able to store items outside of their own inventories by placing chests. This can be helpful when expanding one’s storage capacity in Minecraft, especially when taming horses. In most cases, it is not possible to expand the inventory of a horse without adding an additional chest.
If you are planning a long journey and intend to venture out, there is insufficient space to accommodate all your provisions, even when using domesticated and saddled horses.
Equipping your saddle chest allows for the possibility of carrying extra storage, which makes it convenient for longer trips away from home.
While embarking on such expeditions, one can traverse longer distances expeditiously while retaining access to all the necessary equipment, armaments, and supplies, as they frequently move at a swifter pace than walking or running – implying that possessing a substantial inventory capacity holds particular significance when riding on horseback.
Now, let us get ready to attach a chest to our loyal horse – starting with comprehending the mechanics of taming and saddling in Minecraft, and then collecting the necessary materials! We should prepare ourselves for this task.
Preparing To Equip A Chest On Your Horse

There are three primary steps necessary for taming, saddling, and gathering a horse: taking it, making sure you are ready with this vital item to outfit your horse, and equipping a chest on your horse in Minecraft, which was explained in the previous section for many essential reasons.
Taming horses can seem like a daunting process, but it is quite straightforward. You need to approach one of the wild horses roaming around your world and feed them their favorite treats, such as bales of hay or apples, until they become tame.
Therefore, please exercise patience! Certain horses may require more time compared to others during the taming process. It is crucial to keep in mind that different horse breeds exhibit varying behaviors. Once they have acknowledged you as their owner, it is significant to note that they will begin to accompany you wherever you may venture.
Once the horse has successfully been ordered, creating a saddle for it requires at least one piece of leather and two iron ingots, along with these crafted items.
Now you will be able to move faster than ever before, carrying more items along your journey with your trusty companion. It’s as easy as right-clicking on the empty hand and equipping it onto the horse.
Lastly, the only thing remaining is to collect any extra materials required for constructing a chest, such as boards and twine.
The crafting chest remains the same, holding all the gathered items. Depending on the different sizes, each slot can hold twenty or eight items – depending on how much stuff you want to store. Make sure to stock up enough supplies in the chests to ensure you have everything you need!
Related: What Are the Functions of Nautilus Shells in Minecraft
Crafting A Chest
Crafting the chest becomes quite simple and easy once you possess all the necessary materials. Placing a chest onto your horse in Minecraft serves as a crucial initial action in the process of crafting a chest.
The main components required to create a chest are wooden boards and cobblestone. You will require eight of each material to construct a single chest. To obtain these items, you have the option of either mining them or purchasing them from villagers. Villagers offer the opportunity to buy or mine these items, allowing you to acquire the eight materials needed for crafting a single chest, which consist of wooden boards and cobblestone.
If you plan on mining, be sure to bring tools such as a pickaxe or axe, which can be used to break down wooden and stone-like materials into blocks.
Put together the chest itself! It’s time to, once you’ve acquired all of the required elements. Complete the center with four cobblestones and position four wooden planks in the top and bottom rows of your inventory grid.
Now, all that is left is to equip your newly crafted horse onto the chest. This will create a single item chest that combines when a 3×3 square is formed.
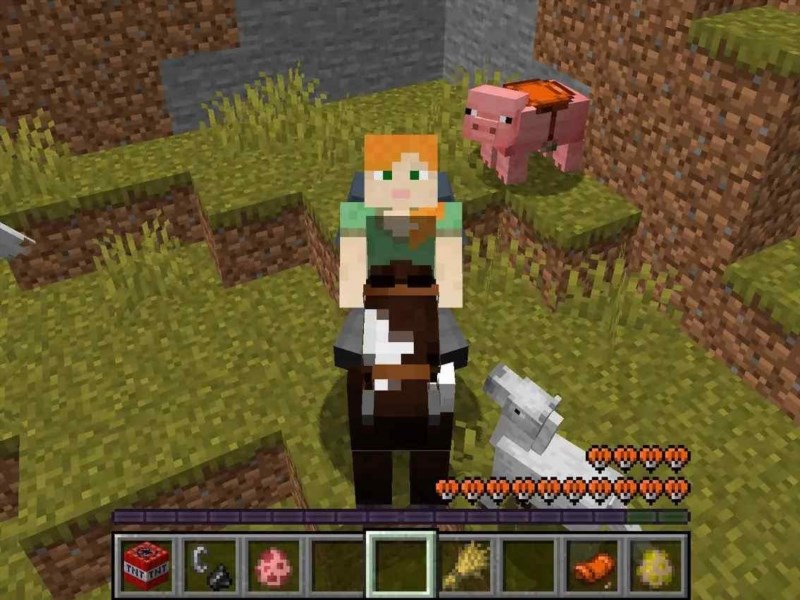
Equipping A Chest On A Horse

It is easy to see how, with a few simple steps, you will be able to store items in the saddlebags of your trustworthy steed! Now is the time to equip it on your horse, a chest that you have crafted.
Step 1: Equip Horse Armor and Saddle
Ensure that your horse is properly outfitted with both a saddle and armor. Additionally, you can attach a chest to its back to offer further defense. If you do not possess these items, they can be obtained by discovering loot chests scattered throughout the world or by crafting them using iron ingots and leather.
Step 2: Place Chest On Horse
Afterward, access the inventory screen for your horse by performing a right-click action on it while holding nothing in your hand. Subsequently, transfer the chest from your personal inventory to one of the available slots. When you place the chest, you will notice the emergence of two additional segments, which serve as storage spaces for conveniently accessing different types of items during gameplay. Throughout the gameplay, you have the option to place various types of items in these two extra sections, which become visible upon chest placement. To accomplish this, select one of the provided slots and drag the chest from your own inventory. Finally, use an empty hand to right-click on your horse and access its inventory screen.
Related: Minecraft Tropical Fish Applications.
Step 3: Access Items Inside The Chest
Everything is conveniently available whenever required, making things uncomplicated! To ensure easy accessibility whenever needed, arrange and oversee the contents of each compartment. Your personal collection (or the reverse) will seamlessly be relocated to these compartments, and they will seamlessly be transferred back to your personal collection (or the reverse) by simply clicking on an item within the designated sections. Finally, when you are prepared to utilize any of the objects stored inside the chest.
Managing horse inventory involves three main aspects: 1. Accessing your horse’s inventory, 2. Organizing your horse’s inventory efficiently, and 3. Finding suitable storage solutions for your horse’s inventory. Let’s now shift our focus to these aspects of managing horse inventory.
Managing Horse Inventory
To manage it in the first step, accessing your horse’s inventory is done by selecting “Inventory” from the menu. Then, you can access your horse’s inventory by right-clicking on the saddle. This will open up a chest containing all the stored items in your horse’s inventory.
| Item | Quantity | Reason for Item Storage |
|---|---|---|
| Hay Bales | 3 | Feeding Horse |
| Saddle | 1 | Riding Equipment |
| Leather | 6 | Crafting Materials |
| Wheat | 10 | Breeding Horses |
To avoid confusion later on, ensure that you take these steps to efficiently and systematically organize your inventory. If possible, try not to exceed 64 stacks of any one type of item. Additionally, when needed, they are easier to locate so you can find crafting materials, food items, or certain types of supplies. Alternatively, you could label bags or chests to easily find them. It is also important to separate and store items in front of the chest, so you can quickly find the items you need. Managing and organizing your horse’s inventory is crucial.
Conclusion
Equipping your journey with a chest on your horse is an important milestone in Minecraft, symbolizing the bond you have with your horse as well as the companionship and trust between both of you. It compares to nothing the thrill of galloping across vast landscapes with your loyal companion by your side, and now you will be able to carry all the necessary provisions and items for longer adventures together.
The act of equipping a chest on your horse also acts as a reminder of the progress you’ve made in taming it. You had to learn how to tame and put a saddle on it, and then create a chest to equip it. Throughout each stage of this process, you not only developed a strong bond with your mount but also enhanced your understanding of survival in Minecraft’s world.
Congratulations on such an impressive accomplishment! Your travels in Minecraft have enriched your own resourcefulness and courage, as you make huge strides towards becoming an expert explorer by putting a chest on a horse.