Game
The Advanced Strategy Guide to Minecraft: Mob Farms, Traps, and Defense
In this chapter, Stephen O’Brien shows you how to guide your strategy in Minecraft’s Advanced Survival mode. It’s incredibly satisfying when you play, as you’ll quickly amass a fortune by farming mobs and collecting resources such as edible items, iron, armor, weapons, arrows, string, and gunpowder. Take control of the mayhem in Minecraft by building a mob farm to gather skeletons, creepers, spiders, and zombies, equivalent to a factory.
This passage is from the preliminary version of the book and may not reflect the ultimate edition of this content.
From the publication
The focus is increasingly shifting towards hostile entities in the game, particularly the farms of Mob (see Figure 4.1). To survive and engage in combat, you will need to grow crops quickly, gather resources that provide countless long-range arrows, and even go crazy with TNT. It will make a huge difference in giving you the necessary resources. However, playing Survival mode can be incredibly satisfying, especially when you know how to put together a mob farm. You can gather edible occasional items, iron armor, weapons, and more from skeletons, creepers, spiders, and zombies. In fact, you can amass resources such as arrows, string, and gunpowder from the mob farm quickly. It’s like having a factory equivalent for chaos control. Have you ever fancied earning an unlimited number of experience points by using enchanting? Instead of just running around the countryside slaughtering hostile mobs to get a few measly items.
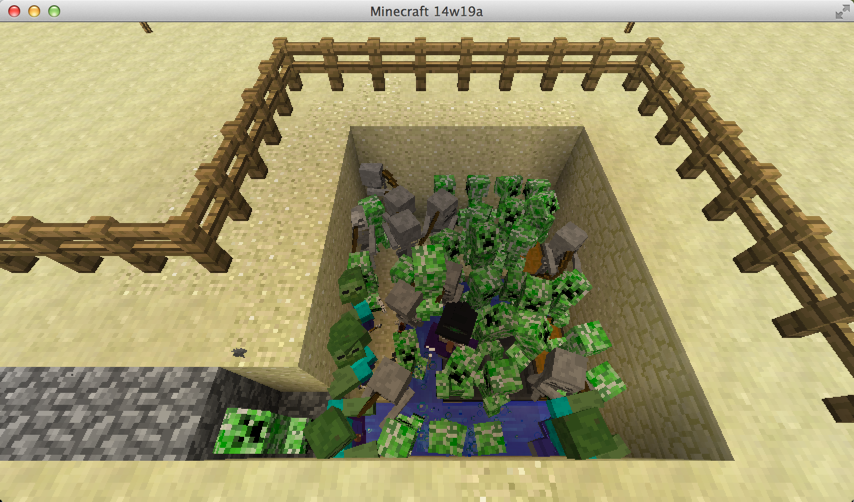
Figure 4.1 Crowds assembled at the foundation of a mob farm, prepared to be assaulted from an underground passage.
Evil Mob Farms
Mob farms consist of two components: spawning and grinding.
The spawner is typically a darkened room designed to encourage mobs to spawn and spring into existence, which then wander and be driven to a central point that feeds into the grinder. Large-scale mob farms can spawn hundreds of mobs per minute, allowing you to quickly accrue experience points by killing them with a single blow, as they can be killed with enough damage that falls through or outright kills the mobs.
Spawning Mob Mayhem
When it comes to keeping your mind focused, it is essential to carefully plan and utilize your resources, especially the simplest spawner, as survival in the game demands it.
Let’s begin with the mob farm and then construct some grinders.
Building a Water-Based Mob Farm
I recommend building in Creative mode in a superflat world to test your skills, as there is a constant risk of falling off precarious perches when building in Survival mode. We are going to take advantage of the height by creating a fall grinder and building in the air. The simplest design uses four canals of water connected by eight blocks of length, with a 2×2 hole in the middle of the platform.
Figure 4.2 Water channels will sweep hostile mobs to their doom.
Figure 4.3 Adding to the mob farm’s frame.
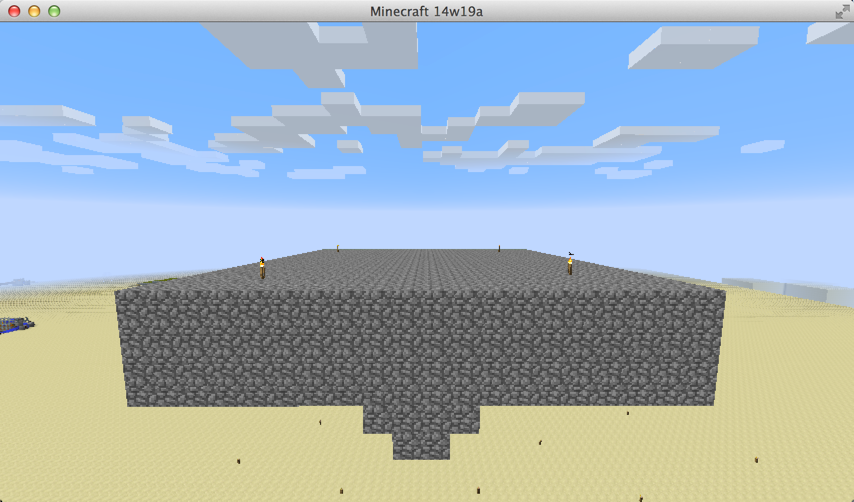
Figure 4.5 The finished farm: a mob spawner floating in the sky.
Grinding Mobs and Collecting Drops
Now that we have a mob spawner, it’s time to automate the grinding of the mobs and the collection of their drops.
There are multiple methods to handle the mobs in a so-called grinder.
I’ll demonstrate methods to construct each of the four.
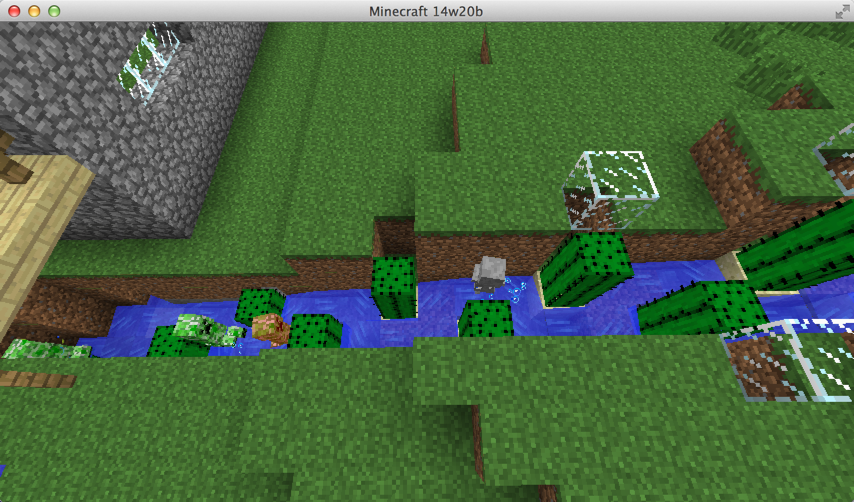
The problem illustrates Figure 4.6, which depicts a cluster of items that will disappear if they are not collected within a five-minute timeframe. It is advised to collect these drops to prevent them from falling. However, please note that if you venture far away, there is a chance that the memory from unloaded chunks may persist and cause items to despawn.
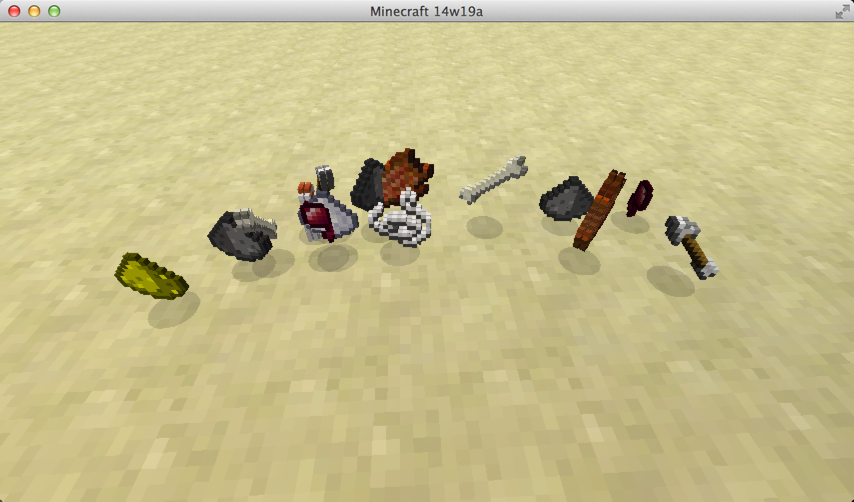
Figure 4.6 Collecting items automatically offers a secure method to guarantee they do not disappear.
Hoppers, whether stationary or attached to a minecart, can sweep up dropped items, so there are two ways to organize the collection:.

Figure 4.7 Hopping to it with a hopper grid to funnel drops from the kill zone into a chest.
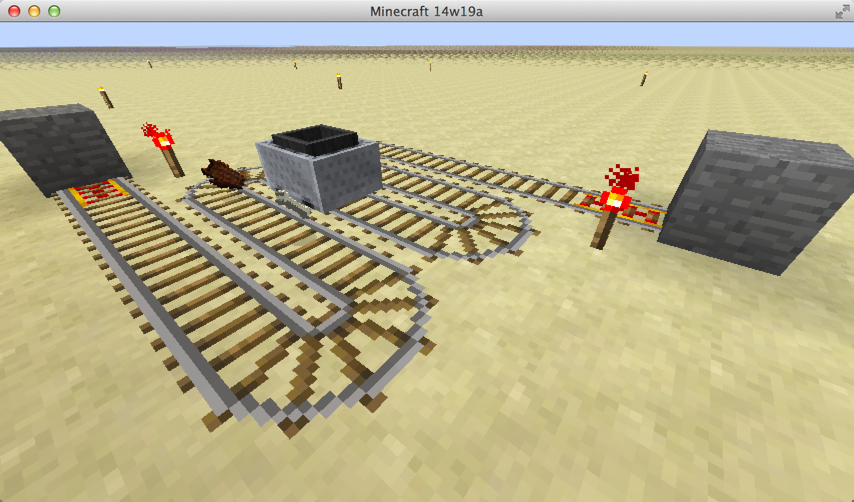
Figure 4.8 A single minecart with hopper and a snaking track can replace the hopper grid and is much less costly in resources.
Creating a blade of lava requires careful construction, as shown in Figure 4.9, where the end result under the mob farm is perched, demonstrating the feeling of being cautious due to the previous experience of being burned twice and the ongoing dealing with lava.
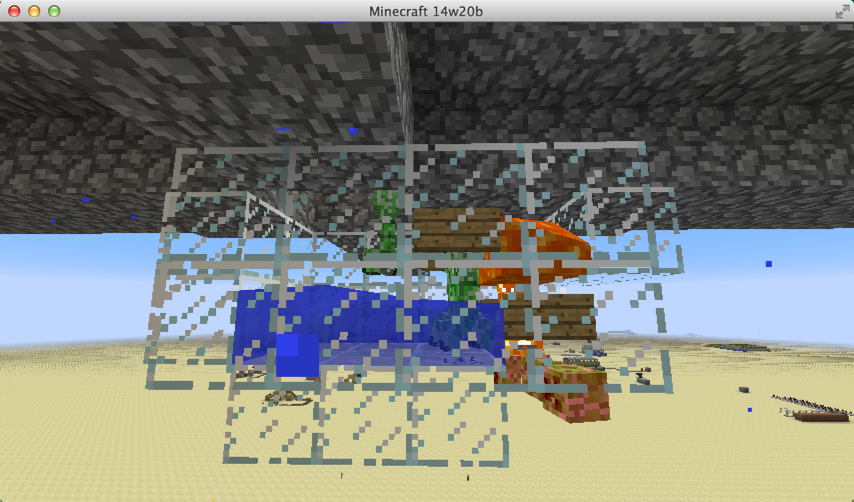
Figure 4.9 The lava blade is a simple, effective mob grinder.
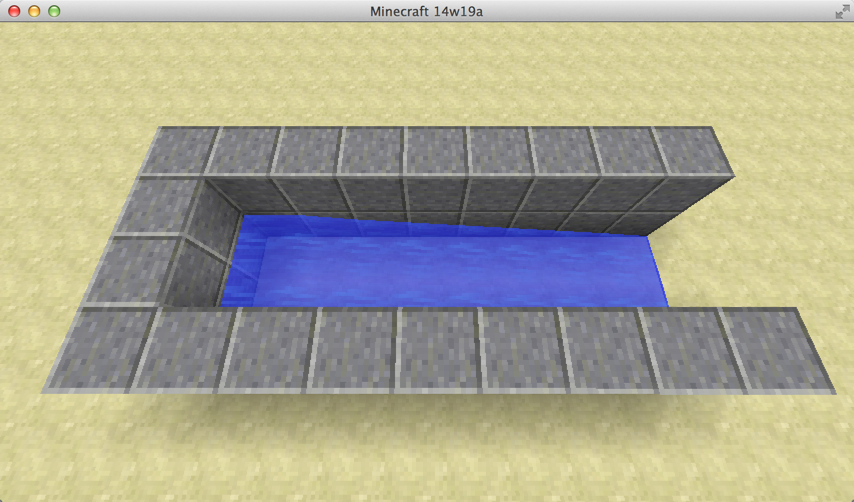
Figure 4.10 The water channel feeds mobs to the lava blade.
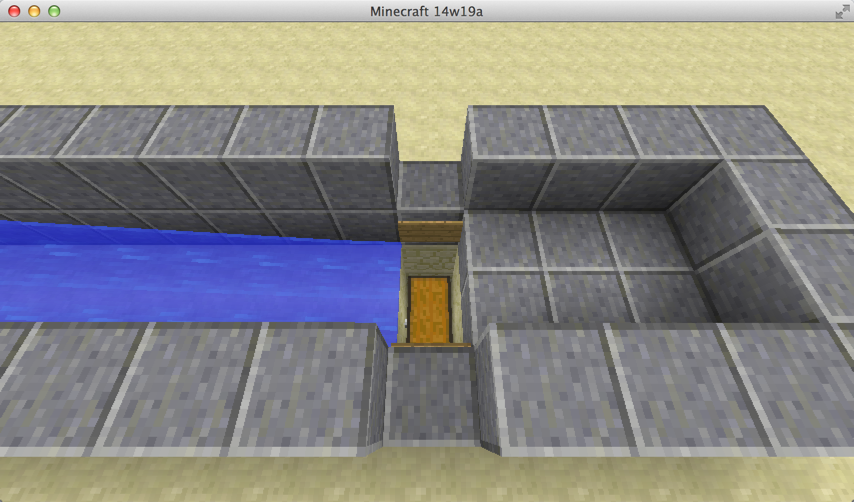
Figure 4.11 Finish the lava side of the blade design with a raised channel and signs or ladders to hold up the end of the lava flow.

Figure 4.12 The final grinder. You may be able to spot the two hoppers at the end of the water channel, under the lava, that will direct any drops into the chest.
Follow these steps to construct the design beneath the farm mob. Additionally, you can reduce the footprint by placing four more signs between each of them, using the lava blade type, which is the most resource-efficient way.
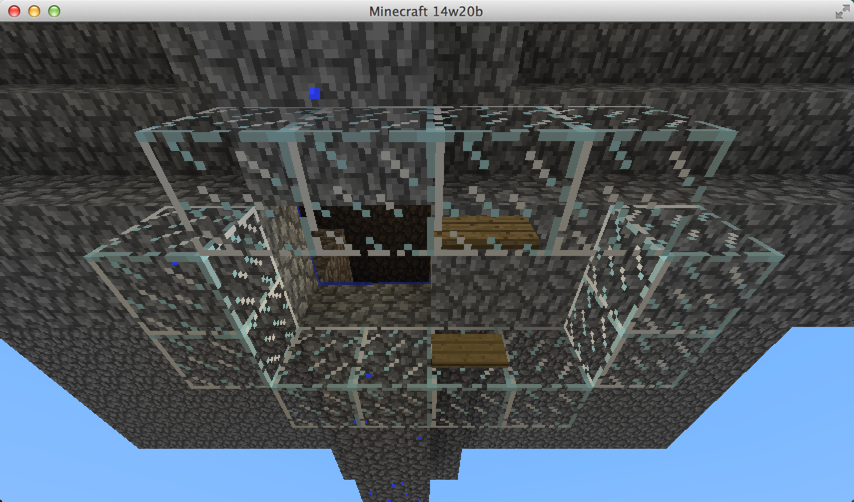
Figure 4.14 Adding the first layer of the lava grinder to the bottom of the farm. Don’t forget the signs!
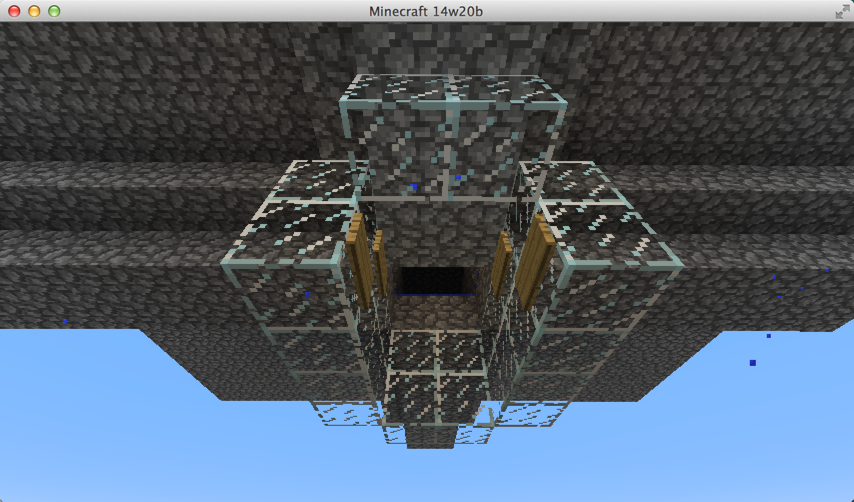
Figure 4.15 Completing the initial shape for the mob grinder.
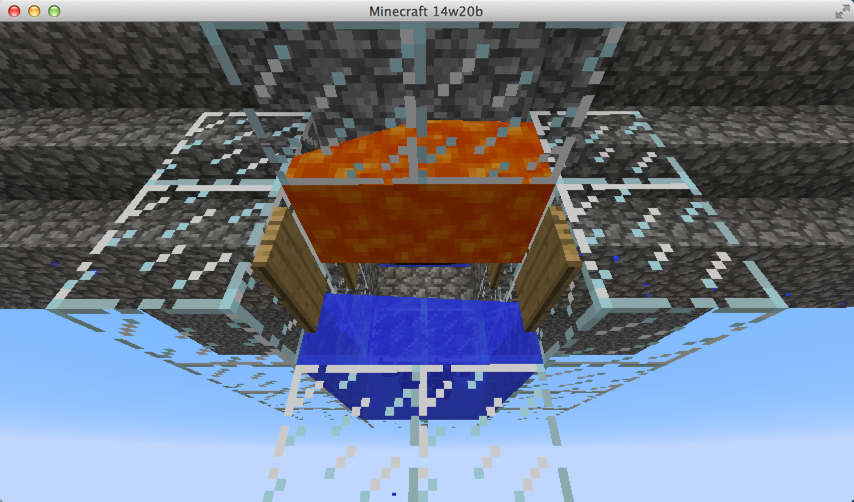
Figure 4.17 Pour water at the far end of the tunnel, and lava at the near end, between the signs.
You should now have the same grinder as was shown in Figure 4.9.
They cannot swim up the water that moves toward the lava where their totems are due to the items dropping above but nonetheless, they will attempt to swim up in the lava. This won’t actually work because they will catch fire and drop down due to the mobs that can catch fire and drop through the outlet grinder. For example, to further reduce the design, they are trying to place a suspended pool of lava under the grinder.
The farm’s entrance is much further back, with a set of eight full blocks of lava as an obstacle. However, you can solve this by extending the water course, which will even cover the lava. Although this compact design has a slight issue of light leakage from the lava, it still greatly reduces the mob spawn rate. This is the final tip for solving the problem.
Before we leave mob grinders or start looking at them in the context of defensive traps, I want to show you one more technique that provides a safe way to collect experience points. Going back to the layout of the hopper, dig out a channel of two deep blocks around the hoppers and place two water sources on either side of the chest. These will flow around the 12-hopper grid and meet on the other side, towards a central point shown as Figure 4.18.
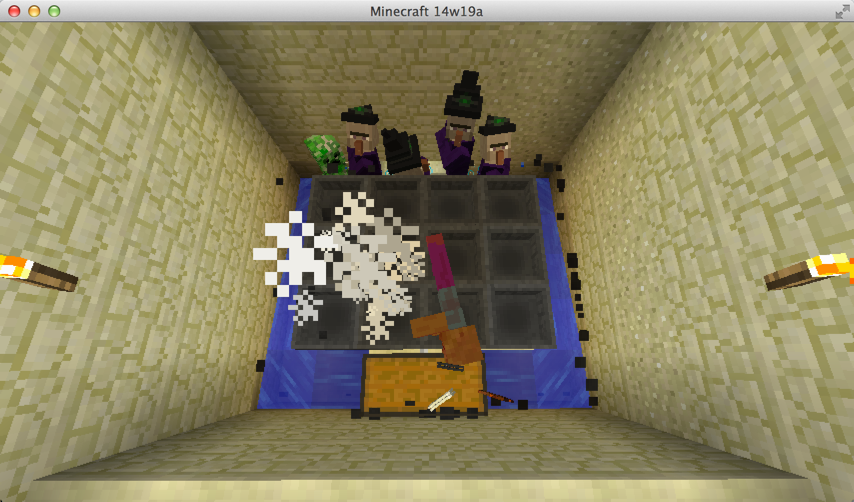
Figure 4.18 Pour water around the hopper to wash away any remaining mobs towards your access point, potentially causing them to stumble.
Dig a single block out of the wall at the level of the water flow. This will allow you to access a path from above that leads to the block one level below, which leads to the removal of the finishing block. By adding hoppers under the blocks at the end of the stream, you can automatically gather the drops that fall into the water stream. You can also collect drops in the water stream by placing double chests underneath them. The mobs that attack you won’t fall back because they are at the same level as your knees, but you will be able to survive their attacks. Both water streams are already at their limit of eight blocks wide, so if you drop spiders that are large enough to survive, they can’t make it through.
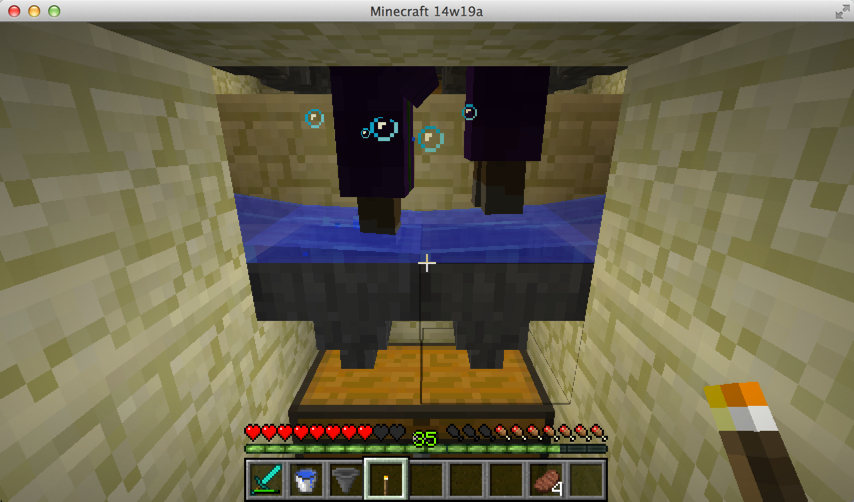
This is undeniably a swift approach to accomplish it, but it may be considered an unjust method to acquire experience points, as illustrated in Figure 4.19.
Dastardly Mob Traps
The cactus is probably the closest thing to a trap tank in Minecraft. While they are primarily designed as a defensive measure, you can also use these other traps as replacements for grinders. They fall into two categories: those that you can corral and kill later for leisure, and those that you can outright kill to keep your base free of hostiles. When it comes to trap mobs, think of them as a defensive measure built around your base, similar to the grinders. There are indeed many cunning designs and numerous ways to build mob traps, as I described earlier with the lava and fall grinders.
Treacherous Trenches
You can add this by sweeping them into a blade of lava. You should be able to go about your business without worrying too much and prevent climbing spiders by adding a transparent block on the top of the wall. Additionally, you can make two wide blocks to catch spiders, making trenches around the perimeter of your dwelling. You can burn them up with a river of lava or sweep them away with a flow of water. The humble trench acts as the simplest trap available for zombies, skeletons, and creepers, by making it two blocks deep.
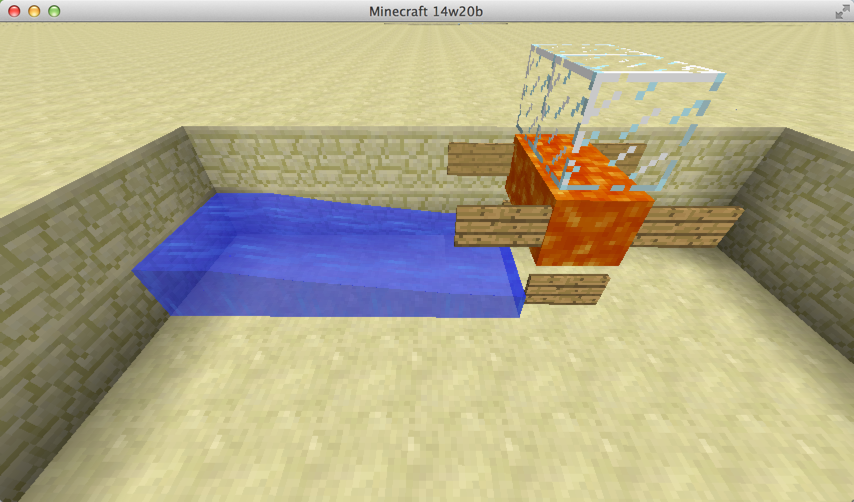
Figure 4.20 A short version of the initial watercourse. You can, of course, extend it as far as you need, around corners and so on.
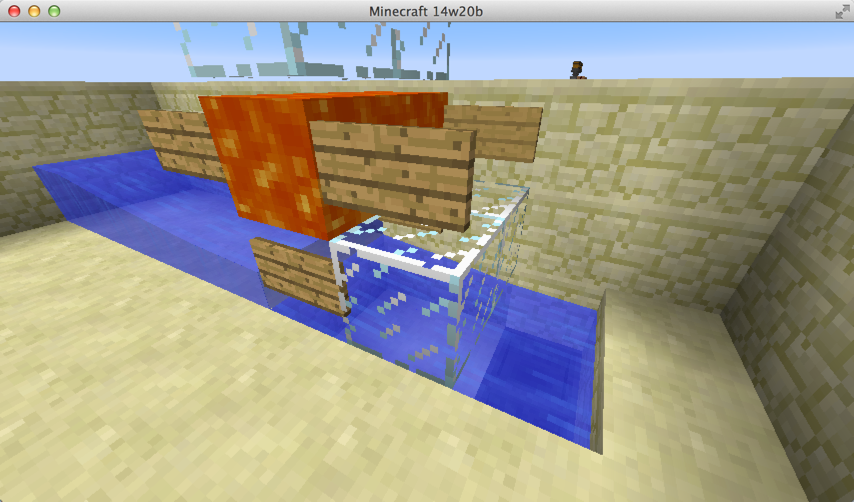
Figure 4.21 Although guarding the perimeter is always worthwhile, it makes sense to also collect any drops rather than letting them go to waste.
If lava is in short supply, you can also use water blocks placed in the V pattern, as shown in Figure 4.22, to create a drowning pit. It will take longer for the mobs to expire, but given that an endless supply of water can be created by dropping just two buckets’ worth into the diagonally opposite corners of a 2×2 one-deep hole in the ground, this type of mob trap is incredibly efficient.
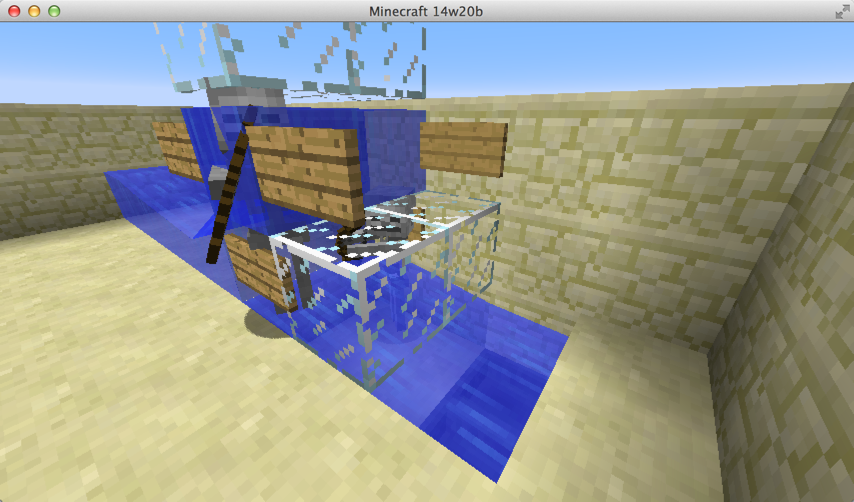
Figure 4.22 Save some trips to the lava pool by using water instead. It’s a little more painful on the ears because the mobs take longer to drown, but it’s just as effective in the long run.
Killer Cactus
In the end, there are at least a few collectibles, with the benefit that the cactus does serve as a very space-efficient grinder. While one wouldn’t wish this upon anyone, the group that is caught in a cactus trap experiences a slow and painful death. However, as a defensive strategy, the cactus works quite well, although it also destroys some of the dropped items, making it inefficient for harvesting in mob farms. This feature makes it one of the simplest components to use in various types of traps. If any mobs or players touch its side, they will immediately suffer half a heart (or one health point) of damage, but it is simple enough to cultivate. The cactus can be quite prickly.
The mobs are eliminated during the procedure, however, as stated earlier, certain items are accumulated in a hopper located in front of the cactus. Mobs should leap over the upper part to avoid a cactus that is at least two blocks tall. The cactus will rise and fall as it draws mobs towards it, and any mobs that enter the water are depicted in Figure 4.23, illustrating the simplest form of a cactus trap.
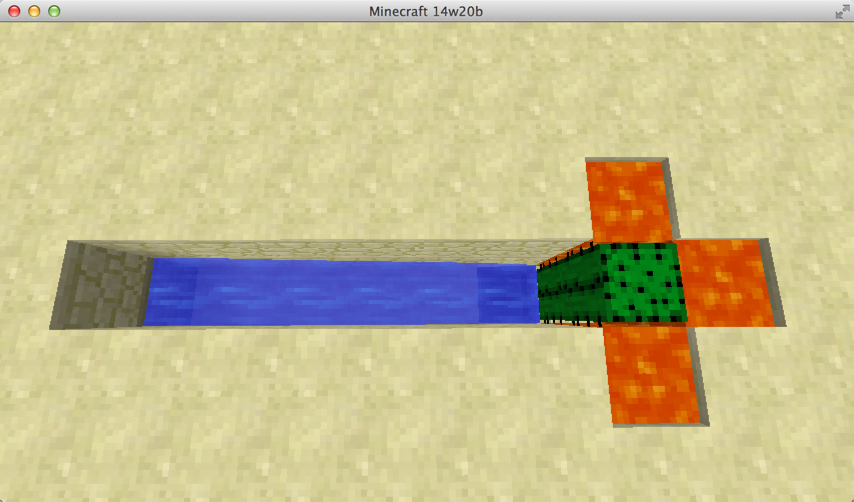
Lava with around spaces three the backfilled I’ve not although. Drops collect to hopper a with trap cactus basic a 4.23 Figure.
To grow a cactus, you need to ensure that you place it in a position where it receives sufficient sunlight, water, and air. Additionally, the cactus requires a transparent block on all four sides, which can be achieved by using sand.
Shifting a small requirement necessitates broadening two channels in order to trap spiders. Figure 4.24 depicts the spatial requirements for cacti, which are positioned diagonally to accommodate them.
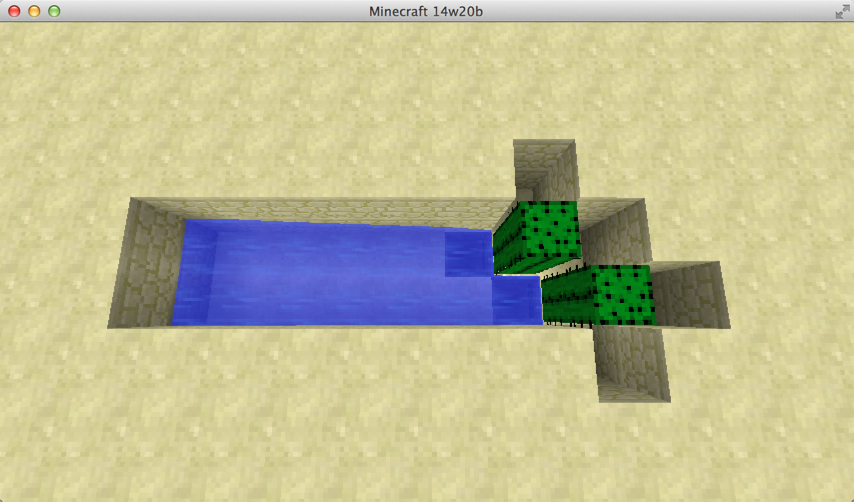
Figure 4.24 A spider grinder based on cacti requires a diagonal arrangement.
One of the many possible designs is a pool measuring 4×4, as illustrated in Figure 4.25. It is equipped with two cacti in the middle, a pair of adjacent hoppers, and four buckets of lava poured into each corner. This setup effectively gathers any unsuspecting mobs towards the center and directs their dropped items into the hoppers. You have the option to either use feeder streams to guide the mobs into the pool or simply let them fall in from above. In the center, the hoppers will collect and sweep the items while the four buckets of lava, two cacti, and two adjacent hoppers ensure that the mobs are contained. Figure 4.25 depicts a pool measuring 4×4, which serves as an example of one of the numerous possible designs.
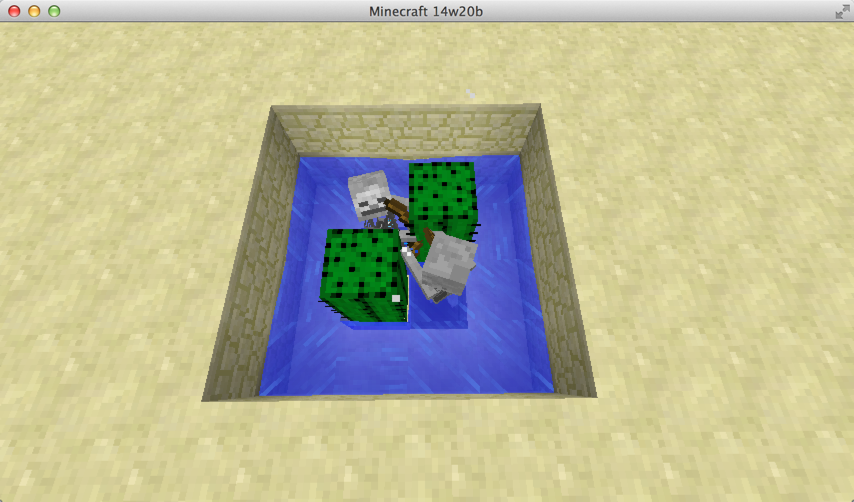
Figure 4.25 A cactus pool with receptacles to gather droplets.
Taking down keel just eventually and go they as hits constant taking down keel just eventually and go they as hits constant taking down keel just eventually and go they as hits constant taking down keel just eventually and go they as hits constant taking down keel just eventually and go they as hits constant taking down keel just eventually and go they as hits constant taking down keel just eventually and go they as hits constant taking down keel just eventually and go they as hits constant taking down keel just eventually and go they as hits constant taking down keel just eventually and go they as hits constant taking down keel just eventually and go they as hits constant taking down keel just eventually and go they as hits constant taking down keel just eventually and go they as hits constant taking down keel just eventually and go they as hits constant taking down keel just eventually and go they as hits constant taking down keel just eventually and go they as hits constant taking down keel just eventually and go they as hits constant taking down keel just eventually and go they as hits constant taking down keel just eventually and go they as hits constant taking down keel just eventually and go they as hits constant taking down keel just eventually and go they as hits constant taking down keel just eventually and go they as hits constant taking down keel just eventually and go they as hits constant taking down keel just eventually and go they as hits constant taking down keel just eventually and go they as hits constant taking down keel just eventually and go they as hits constant taking down keel just eventually and go they as hits constant taking down keel just eventually and go they as hits constant taking down keel just eventually and go they as hits constant taking down keel just eventually and go they as hits constant taking down keel just eventually and go they as hits constant taking down keel just eventually and go they as hits constant taking down keel just eventually and go they as hits constant taking down keel just eventually and go they as hits constant taking down keel just eventually and go they as hits constant taking down keel just eventually and go they as hits constant taking down keel just eventually and go they as hits constant taking down keel just eventually and go they as hits constant taking down keel just eventually and go they as hits constant taking down keel just eventually and go they as hits constant taking down keel just eventually and go they as hits constant taking down keel just eventually and go they as hits constant taking down keel just eventually and go they as hits constant taking down keel just eventually and go they as hits constant taking down keel just eventually and go they as hits constant taking down keel just eventually and go they as hits constant taking down keel just eventually and go they as hits constant taking down keel just eventually and go they as hits constant taking down keel just eventually and go they as hits constant taking down keel just eventually and go they as hits constant taking down keel just eventually and go they as hits constant taking down keel just eventually and go they as hits constant taking down keel just eventually and go they as hits constant taking down keel just eventually and go they as hits constant taking down keel just eventually and go they as hits constant taking down keel just eventually and go they as hits constant taking down keel just eventually and go they as hits constant taking down keel just eventually and go they as hits constant taking down keel just eventually and go they as hits constant taking down keel just eventually and go they as hits constant taking down keel just eventually and go they as hits constant taking down keel just eventually and go they as hits constant taking down keel just eventually and go they as hits constant taking down keel just eventually and go they as hits constant taking down keel just eventually and go they as hits constant taking down keel just eventually and go they as hits constant taking down keel just eventually and go they as hits constant taking down keel just eventually and go they as hits constant taking down keel just eventually and go they as hits constant taking down keel just eventually and go they as hits constant taking down keel just eventually and go they as hits constant taking down keel just eventually and go they as hits constant taking down keel just eventually and go they as hits constant taking down keel just eventually and go they as hits constant taking down keel just eventually and go they as hits constant taking down keel just eventually and go they as hits constant
At the conclusion, the delivery of items can be accomplished by digging a deep trench that allows water to flow down through the terrain, as shown in Figure 4.26.
Indispensible Dispensers
Acquiring a mob farm can quickly provide this resource budget with a piece of redstone and a bow, requiring just seven cobblestone to craft, making it not likely to strain them a lot. The dispenser is a highly malleable key to many types of defensive systems and traps. However, creating each bow may be the most difficult part, as three pieces (the string) need to be collected for each dispenser.
It is easy to create a wall that can be used for offense or defense, depending on your needs. By running a single strand of redstone behind the dispenser, all of them can be fired at once and lined up with a string. This means that you can easily create a dispenser system where all the dispensers fire at the same level. Instead of having to run a pulse directly into the dispenser, you can prove that having a nearby block running any pulse will feed into the dispenser. This simplifies the wiring compared to using devices like pistons, which require a redstone pulse to fire the dispensers. Although this simplified wiring requires a redstone pulse to fire the dispensers, it is sufficient.
Dispensers have various applications
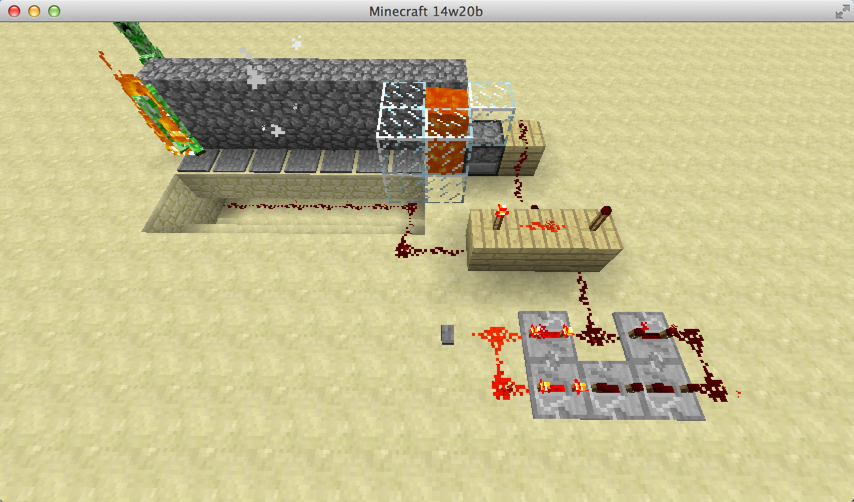
Figure 4.27 An automatic flaming arrow dispenser. (Front wall of tunnel removed for clarity.)

Figure 4.28 Overkill? Nah! Use upturned dispensers kitted out with flint, steel, and pressure plates to create the ultimate mob barbecue.
Pulverizing Pistons
The circuit shown in Figure 4.30 provides a quick and easy way to complete its task, which is to prevent mobs from escaping forward until the glass block is pushed down by the pressure plate, triggering the piston to fire and drop the items it holds. This system requires minimal resources and space, acting as an amplifier by using redstone torches. It is quite useful for preventing suffocation of both players and hostiles (except spiders) as well as dealing with other errant mobs.
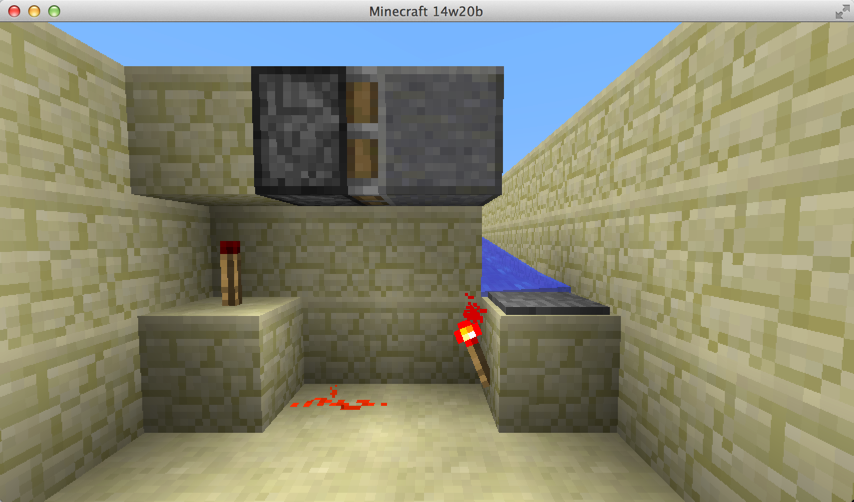
Figure 4.30 A simple mob suffocater utilizing pistons and a pressure plate.
The chute allows all sensors, daylight detectors, and comparators to drop items into the pit. Additionally, torches and plates can be placed on top of the hoppers to allow for the placement of redstone and other partial-height items. By clicking on the hopper while holding the Shift key, you can position the plate as the top of the hopper. At the end of the water flow, the hopper should be positioned at the same level as the plate, as shown in Figure 4.31. However, we can improve this design by picking up the items or stopping them from despawning until they sit on the pressure plate. The only issue with this design is that it lacks a system for collecting the dropped items.
Input: Placing a hopper under the pressure plate (as shown in Figure 4.31) enables convenient collection of the mob drops without the need for manually picking them up.By positioning a hopper beneath the pressure plate (as depicted in Figure 4.31), one can conveniently gather the mob loot without having to pick them up manually.
A slight change in wiring is required to detect the output from the pressure plate, which is set to be in front of the block adjacent to the torch under the block behind the piston. Additionally, the hopper for the chest and iron requires more improvement than the other little requirements.
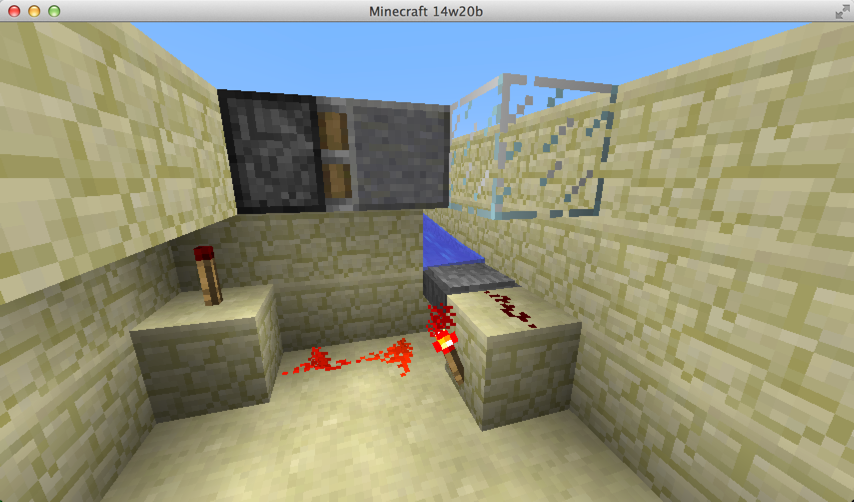
The design of the piston makes it impossible to crush mobs that are placed on the same level as the high block because any piston placed on top of them will push them over and scrape them off the plates. There is a glaring issue with this design. Figure 4.32 shows an example of how to override this issue by using a lever placed in one of the redstone torches, but another gate is required for this. One final note: Tripwire is an excellent way to trigger pistons, as it requires a manual override to retract the pistons and permit the collection of dropped items and mobs.
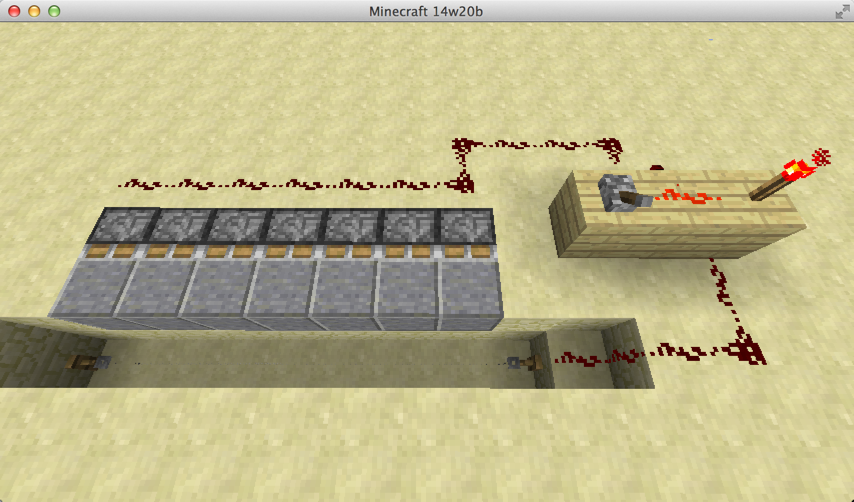
Figure 4.32 A tripwire and piston design using an AND gate to forcibly retract the pistons, providing access to any dropped items.
The Bottom Line
In this chapter, I have provided an overview of various types of traps, grinders, and mob farms in Minecraft. There are numerous ways to improve, combine, and modify these designs to suit your own needs. You will need to meld these ways together, and in many cases, you will need to modify the designs to suit your specific requirements or devious plans. There is no singular best way to create any of these, as it all depends on the ethos of Minecraft.
Of, if you’re playing on other servers and want to install the Chunks Chicken mod, you can share the game on a LAN and have multiple licenses of Minecraft. However, if you want to allow other players to spawn in their own private areas, you need to keep a polite distance of 24 blocks in any spherical direction from their location. In order to increase the spawning rate on your farm, you need to stay fairly close to it within a square area of 15×15 chunks or 240 blocks per side. It’s important to note that there are no spawning areas within water-filled parts or caves, so it’s easier to have a farm in deep ocean biomes where caves are not as common. Simply blocking them off won’t suffice, as mobs can still spawn in areas with light and underneath the ground. Remember this when planning your mob farm.
Delving into the use of mob farms and grinders is the ultimate method for acquiring vast quantities of valuable resources. Embrace this approach as it consistently yields rewarding outcomes; you will undoubtedly discover the benefits they offer.