Game
Tutorials/Egg farming
Jun
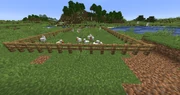
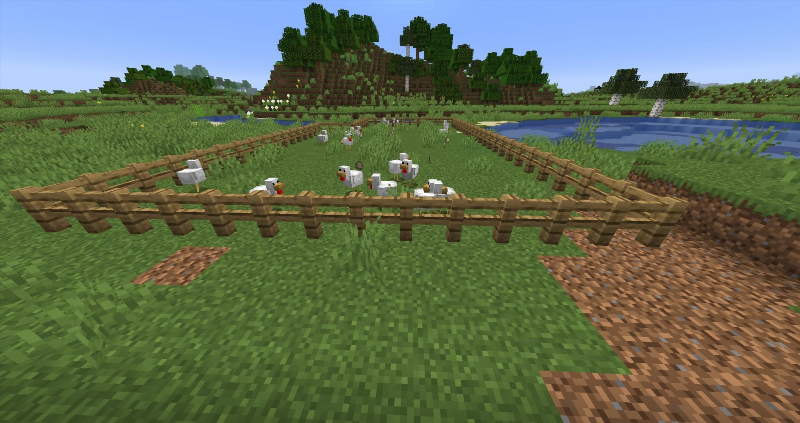
Traditional egg-farming
Amongst all the animals that can be farmed in Minecraft, the chicken reigns supreme. This feathered friend doesn’t need any sustenance to mature or breed, making it a low-maintenance option for players. No matter where you keep them, the chickens will take care of themselves. Moreover, when cooked, their meat is just as satisfying as other meats for satiating hunger.
Catching or hatching a chicken[]
To ensure that your feathery friends stay put, crafting a pen to contain them is a wise move. A modest wooden fence or a cozy cave will get the job done, but incorporating an “entry lock” is encouraged. This involves erecting a fenced area with gates leading to both the pen and the great outdoors. By keeping one gate closed at all times, the chickens won’t be able to sniff out a potential escape route.
To corral chickens, the tried-and-true method is to lure them with any type of seeds. As their curious eyes lock on you, they’ll obediently trail behind, following you to the pen. However, for those with a bit more finesse, leads fashioned from slimeballs and string can be employed to keep them close at hand. Each chicken requires its own leash, but the result is worth it – no more wandering birds. And for the truly skilled, chickens can be led across bodies of water, dutifully paddling behind your boat.
A novel approach is to gather eggs and fling them into your enclosed enclosure. The likelihood of hatching a chicken from an egg toss is a mere 1 in 8, thus it’s advisable to amass a full stack. Patience is needed for them to mature, but once you’ve got one fully-grown fowl, it’ll start laying eggs, and with two or more adults, you can pair them up with any seed to breed. Each grown chicken will produce an estimated 8 eggs every hour.
As you embark on the adventure of hatching numerous chickens, it is important to keep in mind that a considerable amount of time will be required for the chickens to replace the eggs used in their hatching process. It is crucial to note that the time spent skipping nights in a comfortable bed will not contribute to this period, and the area where the chickens reside, whether it be near a player or in the spawn chunks, must remain loaded. Additionally, it is imperative to collect all the eggs as they have a tendency to disappear after a mere five minutes.
Setting up the farm[]
The age-old method of manually scouring the farm to gather chicken eggs can be replaced by a more efficient process.
If you’re feeling adventurous, why not try out one of the following tutorials to construct a farm that expertly funnels eggs to a singular destination? And as a bonus, many of these tutorials also work for collecting chicken meat, feathers, and valuable experience orbs.
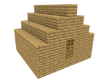
3x3x4 Automatic Farm[]
Behold, behold! Feast your eyes upon this humble yet mighty egg farm, composed of a mere 8 blocks, a hopper and chest. In the golden days of yore, before the advent of Java Edition 1.11 and its pesky maxEntityCramming gamerule, this farm was the undisputed king of egg production, housing hundreds of clucking chickens in a tiny 1×1 space. Alas, the times have changed, and now the limit stands at a mere 24 feathered friends. Be sure to check your server’s settings before committing to this farm, lest you fall victim to the dreaded entity cramming. But fear not, for there is a solution! Simply place a solitary vine block in the space occupied by the chickens, and they shall be spared from the cruel fate of being crammed together like sardines.
Bottom Layer.
Two Layers in the
The aperture located at the pinnacle can function as a unidirectional entry point or be completely enclosed. Initiate the mechanism by luring in a fowl or hurling eggs against the inner surfaces.
Building up[]
Envision an expansion of this system, where a spacious living area awaits with all hoppers converging into one that leads to a chest. However, at a specific juncture, the system becomes susceptible to the emergence of mobs. To combat this, the placement of slabs over hoppers is implemented as a deterrent for mob spawning, while still allowing hoppers to retrieve dropped eggs through a slab. But, as the cost of utilizing numerous hoppers becomes exorbitant, an alternative method of water flow is utilized in the revised version to substitute the initial collection process.
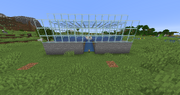
11x11x6 Automatic farm[]
The hopper egg farm boasts a straightforward design, free from dependence on nether quartz. On the ground level, chickens are kept in check by water as they mature and produce eggs. The eggs are then funneled into a hopper, which redirects them to the supply chest of the system. This chest serves as the primary source for the automatic hatcher, responsible for replenishing the main floor after every harvest. To maintain order and prevent the spawning of chickens indefinitely (or until the server goes kaput), a despawn timer manages the hatcher’s operations.
A protective 11×11 fence or wall will encase the farm, equipped with doors or gates at the midway point of one side. In the center, a towering pillar and a partial roof will provide cover, while a “egg room” dug three blocks down will be situated below. The egg room and its central structure can be easily modified to suit various farming designs. A tunnel leading to the egg room must also be constructed, complete with enough room to access the chest and other necessary tools for acquiring meat and feathers. Moreover, switches will be required to activate or deactivate the hatcher. The chickens will be contained by water, making the farm resistant to any issues caused by chickens wandering through walls or fences. The schematics are presented below, with gold and stone-brick blocks representing “any full block,” but the gold blocks must also be opaque, while the stone-brick blocks can be opaque, transparent, or in some instances, air.
Plans for an Egg Farm that is
[Schematic Help].Materials[]
Building it[]
When constructing the egg room, setting up the walls should be done first. To simplify the process, building from above is ideal. It is important to keep in mind the positioning of the input hopper and ensure that it is at the center of the floor. Adequate lighting is also necessary to create the perfect environment for the eggs. Careful consideration should be given to the access tunnel, as it dictates the direction of the room’s orientation. For instance, a strategic placement of an access corridor leading to the lower left of the diagram provides easy access to all the containers and switches.
Upward-facing droppers and a dispenser sit atop each other in the hatcher, which is powered by a 3-clock and supplied by hoppers. A chest provides additional storage for the system. On the diagram’s right edge, a lever attached to a block southward and downward from it allows for the complete disablement of the hatcher. This means you can build the rest of the system without the interruption of clicking noises as soon as the clock is constructed.
Positioned at the upper edge of the diagram, the despawn timer comprises a dropper that faces downwards towards a pressure plate. Its mechanism functions by releasing an item onto the pressure plate, which in turn shuts off the torch and triggers the clock until the item naturally despawns. A block situated directly in front of the pressure plate acts as a safeguard against inadvertently picking up the item while passing by. However, it is still possible to disrupt the timer by approaching the item close enough to snatch it up. Once the despawn timer is installed and linked up, the lever can be switched back off, leaving the clock deactivated. The dropper of the despawn timer can be loaded with any dispensable item, including superfluous seeds or eggs. The block positioned in front of the pressure plate merely serves as an extra precaution to deter accidental item snatching. Glass material is recommended as it allows for clear visibility of the item’s placement on the pressure plate.
After completing the egg room and sealing it off, it’s time to move on to the central pillar. Start by placing a top slab over the hopper, followed by two blocks above that. For a touch of simplicity, the lower block can be a jack-o-lantern to provide lighting. Extend a roof from the top block of the pillar over the dispenser and around it in all directions. To prevent any unwanted monster spawns, place a torch on the roof. It’s important to note that if you use slabs, there’s a chance that chicks might end up on top of the roof. If your roof is minimal, they’ll simply fall into the water. However, if you want to expand the roof to the edges, it’s best to use non-transparent blocks to keep any escapees from getting away.
It’s important to keep in mind that the dispenser is intentionally separated from the collection hopper and central pillar to allow for flexibility in its aim. If you decide to include the optional chest, a transparent slab (or similar block) should be added between the dispenser and hopper. However, if you choose to use an opaque block instead, the chest will not be accessible. With the release of version 1.14, it’s possible to add the optional chest without connecting it to the main chest. This can be a handy option for storing extra eggs, particularly when you’re preparing to harvest and need to free up space in the main chest for feathers and meat.
As a final step, strategically place water-filled buckets at each corner, allowing them to cascade towards the central pillar. Load up your treasure chest with a combination of fragile eggs and weighty lead, and with a simple press of a button, let the magic begin. Allow the eggs to accumulate until you have amassed a sufficient amount for a successful run, ideally at least twelve stacks in the chest. In the case of starting with limited resources, a preliminary run with a few stacks can help to increase the number of chickens and eggs, thereby expediting the process. If you have an abundance of eggs, consider disabling the despawn timer for an extended run by attaching a lever to the output torch block or opt for a consecutive run immediately following the first.
By combining glowstone and nether quartz, you have the option to add a pair of top slabs to level one, adjacent to the hoppers. Place a comparator facing away from the main chest on top of the slabs, along with a signal provider set to 8. This indicates when there are 13 stacks of items in the chest, enough for a full run. A partially eaten cake with three slices removed will suffice. Connect the comparator to a redstone lamp using a redstone trail. If you embed the lamp in the ground near the entrance, you can activate it with eight or fewer dust particles. If the distance is greater, add a repeater to the circuit. Note that this schematic does not require Nether materials if the lamp is not embedded.
Running the farm[]
Disabling the clock can be achieved through two methods – either by the inactive timer or the lever. Once the clock is disabled, the incoming eggs follow a systematic filling process: bottom dropper, bottom hoppers, chest, and intake hopper. This configuration provides a whopping 52 stacks storage. However, for those who need even more storage, an optional second chest can boost the capacity to 79 stacks.
A whopping 79 stacks of eggs can yield an average of 163 chickens, a number that could bring your game to a grinding halt if you’re nearby. The sluggish hoppers take over 15 minutes to feed through, and if you let the hatcher run too long, the first chickens will mature and start laying eggs, causing exponential growth that’s limited only by the speed of the hoppers. Once the system reaches the second generation, it will produce 2.6 chickens per minute, but if the game doesn’t crash, it will peak at 18 per minute or 363 per game day. With such massive numbers, chickens will overflow any enclosure and cause severe lag. But if you’re willing to risk “Chickmageddon,” you can skip the despawn timer for the top two rows of the egg room. In newer versions of Minecraft, overcrowding leads to chicken suffocation, but this design might not be enough to prevent issues.
Utilizing the despawn timer and inverter, you can set the clock for a brief 5-minute interval, providing ample time to hatch up to 500 eggs simultaneously. That equates to roughly 31 stacks, ultimately producing an average of 64 chickens. The catch? The clock period spans a mere 0.6 seconds, meaning that 300 seconds may yield 500 cycles, but the dispensary and clock operate at a faster pace than the hoppers that feed them. In fact, the hoppers deliver less than 375 eggs to the dispenser alone. Thankfully, the eggs in the bottom dropper offer a head start, allowing for precisely 500 eggs to hatch in one go. As previously mentioned, it’ll take a little over an hour in real-time for the chickens to replenish the eggs used. However, if you’re impatient and don’t want to wait, you can harvest the mature chickens and run the egger again. This allows the second batch to refill while you tackle other tasks.
//www.youtube.com/watch?v=KKPuHjRi3sk
//www.youtube.com/watch?v=0PLMrZCVCH8
Joghurts Design[]
Joghurts egg-farm
Bottom layer of Joghurts egg farm
Begin by excavating a perfectly symmetrical square-shaped cavity, measuring precisely 11 blocks by 11 blocks in length and width, with a depth of merely one block. Next, carve out an additional circular layer surrounding the square-shaped hole. Ensure to leave a single one-block aperture in the middle, which will serve as the outlet for the water and eggs.
To safeguard the poultry from being swept away and to provide a breeding ground for their eggs to hatch and increase the overall chicken count on your land, it’s crucial to construct an “island.”
Link the core drainage orifice to your setup from underneath, pour liquid at the edges, and you’re all set.
Trench Farm[]
Minecraftmaximizer’s “14 Second Compact Egg Farm” is a nifty design that takes a mere 14 seconds to construct in the Minecraft 1.5 release. With 8 logs of wood, 10 ingots of iron, two arbitrary blocks, and an optional ladder, this farm is essentially a 3x3x4 structure that’s built in a pit.
The commencement of this farm requires excavating a hole that is three deep, four long, and one wide. The placement of chests and hoppers on the bottom is crucial, where one side accommodates a double chest while the other has two hoppers feeding into it. A ladder conveniently runs over the chests for easy access. To prevent the chickens from wandering off, two blocks are placed next to the hopper beside the chest. Once the chickens are hatched over the exposed hopper, the eggs can be collected from the chest at a later time.
With a volume that’s limited to merely twelve blocks, this farm earns the distinction of being one of the most space-saving and compact farms available. Notably, hoppers are included in the setup, as evidenced by a video showcasing the farm in action and a detailed schematic.
Hopper-Enhanced, Space-Saving Egg
//www.youtube.com/watch?v=COsjvdsZ4_o
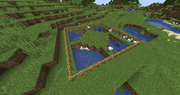
Water Egg farms[]
The majority of contemporary egg farms employ a clever technique to house their chickens, with a system that utilizes water to collect the eggs. The water is ingeniously held in place with the aid of signs or ladders, preventing it from spilling into the collection area below.
Construct a space-savvy structure by enclosing a 2x2x2 column with walls. Ensure to leave a door for accessing the lower two compartments that serve as the collection area. The upper section of the second compartment includes four signs to support the water. The following two layers consist of a still water pool, which should be entirely made of source blocks to avoid any flow, especially downwards. The chickens will reside both in and above the water, requiring a gap of 1 or 2 blocks above the water level for breathing. To prevent the chickens from suffocating each other, use glass blocks for the walls surrounding and above the water.
Once this structure is built, eggs can be easily hurled upwards from the gathering zone. The hens will glide gracefully on the water’s surface, allowing their eggs to drop gently to the ground for effortless retrieval, which can then be reused to breed new chickens. In times of need for meat or feathers, a sword can swiftly remove the chickens from beneath. Although a water flow can be installed in the gathering area to combine the eggs into a single block, this may pose challenges in throwing eggs and collecting meat or feathers.
Automatic Egg Farm
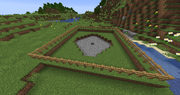
The stagnant water in the aforementioned design poses a problem with certain eggs adhering to signs. However, by expanding the pool’s surface area and dubbing it the “Flowing Egg Farm”, a water flow is created that gathers eggs to the center. This inward current also prevents chickens from effortlessly passing through the walls, allowing for a higher capacity of chickens to be raised. There are options for this design, such as creating a “squared off” pattern that flows towards a central 2×2 opening, or extending it horizontally with another water current to transport eggs down a “collection corridor”. The width of the pool need not be the full 18 blocks, as long as the collection area lies beneath where the currents converge.
Gallery of Aquatic Egg Cultivation
A sprawling egg farm of considerable
//www.youtube.com/watch?v=YsTX85vXXdM
Realistic Chicken Coop[]
Crown each Hopper with a plucky Chicken. A Coop’s capacity extends to 6 feathered friends. Should you desire a more aesthetically pleasing appearance, consider swapping out the oak wood planks for stone or cobblestone to reflect the biome or your personal preference.

Ground Layer.
Layer 1.
Layer 2.
Layer 3.
Layer 4.
Layer 5.
Chicken farming and cooking[]
In the world of poultry farming, a chicken farm is a hub of activity that yields a variety of chicken products such as freshly slaughtered meat, cooked delights, and even feathers for various purposes. Typically, these farms feature a clever system that involves an egg source, a mechanism to hatch the chicks, and a device to efficiently capture mature birds and extract their valuable resources.
Extending the 3×3×4 farm[]
The egg/feather hopper can undergo a minor adjustment to transform into a dropper/hopper path that leads back to an egg dispenser, which is triggered by clock circuit pulses. This dispenser operates by repeatedly throwing eggs into the chicken zone, thereby establishing a self-sustaining cycle that generates an ever-increasing number of eggs and chicks. However, if left unattended, the game may experience significant lag due to the excessive amount of chickens, potentially before the maxEntityCramming gamerule is activated.
Utilizing a dispenser equipped with a bucket, one can employ a block of water, resting atop an air block that is regulated by air, as a clever “kill switch” for securing cooked chicken. By allowing the water to flow downwards, this effectively prevents the chickens from swimming upwards, while a trapdoor lid placed on top ensures suffocation. However, for a fiery twist, one can replace the water block with a block of lava and create a farm that yields delicious cooked chicken.
Filtering out immature chicks[]
Placing a lower-half slab atop the hopper is an effective way to sift through juvenile chickens that yield no bounty. This clever tactic prevents unwelcome intrusions of water or lava while still permitting full-grown fowl to meet their untimely demise by suffocation or burning.
Full automation[]
To take the automation process to the next level, a crucial modification is to discard the kill-switch mechanism and opt for a more consistent means of ending the chicken’s life. One way to achieve this is through slab construction that allows the chickens to mature before reaching their demise. However, it’s worth noting that this method fails to address the issue of the egg supply, as it instantly eliminates mature chickens, leaving no chance for egg replenishment.
To implement the solution, we propose the integration of a specialized egg farm. Instead of relying on the closed-cycle egg dispenser, we suggest utilizing an independent egg farm and a collecting hopper. By employing a large chest to distribute the eggs from the new farm, you can conveniently collect them for both consumption and chicken farming. Regulating egg input allows you to manage the rate of egg production. The advantage of this farm is that it offers an unlimited source of eggs, thanks to the adult chickens residing within. These eggs can be transported to another facility where they are processed into meat.
A prime example of a farm that utilizes 50% of its egg yield for crafting delectable lava-roasted chicken
Clock circuits are linked with dispensers.
In the world of Minecraft, the timing of natural processes is fascinating. Did you know that a tiny baby chicken takes just 20 minutes to grow up? And if you’re waiting for an egg to hatch, you’ll only have to wait 1/8 of the time it takes for a chicken to lay an egg, which is usually between 5-10 minutes. To control the amount of eggs entering the system, you can use redstone controls on the egg-feeding hopper. It’s amazing
Example farms[]
//www.youtube.com/watch?v=UXNQpI0rtFs
//www.youtube.com/watch?v=-3w__QiKXjI
//www.youtube.com/watch?v=KoTQZ67d6cE
//www.youtube.com/watch?v=8AL17eBo2EQ
Trivia[]
| Tutorials | |||||||||||||
|---|---|---|---|---|---|---|---|---|---|---|---|---|---|
| Introductory |
|
||||||||||||
| General |
|
||||||||||||
| Challenges |
|
||||||||||||
| Constructions |
|
||||||||||||
| Farming |
|
||||||||||||
| Enchanting and smelting |
|
||||||||||||
| Blockbreaking |
|
||||||||||||
| Mechanisms |
|
||||||||||||
| Servers |
|
||||||||||||
| Technical |
|
||||||||||||
| Outdated |
|
Nguồn tham khảo: 1