Diablo
Docker network host | How to work with network host in docker?

Jul
Revised on May 15,
Introduction to Docker network host
The Docker network host serves as the default network driver within Docker, enabling the container to share the host’s networking namespace and eliminating the need for network isolation. Consequently, no IP-address is assigned to the container within this network mode. It is important to note that port-mapping options like ‘-p’, ‘-publish’, ‘-P’, and ‘-publish-all’ are disregarded, resulting in the inability to publish any ports for the container. Essentially, the Docker daemon discards any published ports when utilizing the host network mode.
Syntax:.
$Docker run -d –network host –name my_con nginx
![]()
How to work with network host in docker?
We have to specify the ‘-network’ option and provide ‘host’ as an argument in order to utilize the host network driver while a container is running. It is worth mentioning that when using the host network driver, the container does not receive an assigned IP address. Therefore, if we bind port 80 to a running container that is using the host network, the application inside the container will be accessible on port 80 using the host’s IP address. Additionally, it is important to note that it is not possible to bind the same port to two different containers. The host network mode is implemented to optimize performance by eliminating the need for network address translation. It is essential to remember that this driver is exclusively compatible with Linux hosts and is not supported on Docker Desktop for Mac, Docker Desktop for Windows, or Docker EE for Windows Server.
The swarm service can also utilize this network mode, but it does come with certain additional restrictions. For instance, when we bind a service container to port 80, the Docker daemon will only execute a single service container within a particular swarm mode.
Examples
Let’s comprehend it with a couple of illustrations: -.Output
Example #1
To display the host network in Docker, we can utilize the following command: -.Output: To showcase the host network in
$Docker network ls –filter driver
![]()
Explanation: In the previous screenshot, it is evident that we have a host network called ‘host’.
Example #2
We have to use the below command to connect the host network to a container while running: -.Output: While running, we need to utilize the following command to link
$Docker run -d –network host –name my_con nginx
![]()
Explanation: In the above example, we have created a container named ‘my_con’ with the ‘nginx:alpine’ Docker image and used the host network.
Example #3
Let’s attempt to generate a fresh host network utilizing the following command and observe the outcome.
$Docker network create host2 —
![]()
Our attempt to establish a host network called ‘host2’ in the given example was unsuccessful since we are limited to creating only a single host network on a local basis.
Scenario: Build an nginx container and attempt to access it externally while keeping the port hidden.
Step 1: To begin, let’s create a container using the Docker image called ‘nginx:alpine’ as shown below:
$Docker run -d –network host –name my_nginx
![]()
Explanation: In the previous example, we have established a container ‘my_nginx’ and connected it to the host network.
Step 2: Let’s attempt to connect to nginx on port 80 from the local machine.
$Curl http://localhost:80.
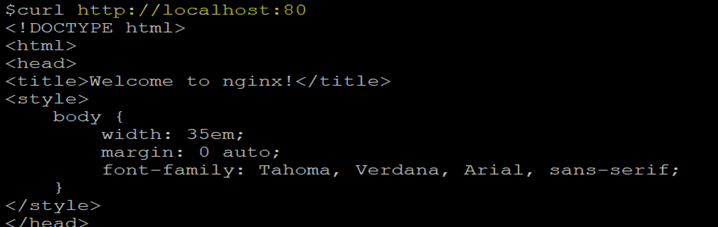
The snapshot above showcases the effortless local accessibility of the nginx server on port 80, completely avoiding the need to expose any ports from the host to the container. This seamless connectivity is made possible by directly sharing the host network with the container.
Step 3: Next, let’s generate an additional nginx container and check if it is feasible or not.
$Docker run -d –network host –name my_nginx
![]()
In the snapshot provided, an attempt was made to generate a new container called ‘my_nginx2’. Nevertheless, upon inspecting the container status, it is observed to be in an exited state, as depicted in the subsequent snapshot: -.

Let’s delve into the logs to uncover the underlying cause. Thus, in the snapshot provided below, it explicitly states ‘Address in use’ which is a result of port 80 being occupied by a container that is already in operation.

Please be aware that in host network mode, it is not possible to run multiple containers listening on the same port. Nevertheless, you can still run a container that listens on a distinct port.
Advantages
Conclusion
Docker’s host network serves as a means to abolish the boundaries between container and host, allowing for seamless connectivity. The decision to utilize this network depends entirely on our specific needs and circumstances. Additionally, there exist alternative network drivers such as bridge, overlay, macvlan, and none.
Recommended Articles
Explore the realm of Docker network host with this comprehensive guide. Delve into the intricacies of working with network hosts in the Docker environment and enhance your understanding through illustrative examples. Expand your knowledge further by referring to the accompanying articles provided below.