Diablo
Exploding Shadow Mist Necromancer Endgame Build for Diablo 4
Jul
Behold, behold! Witness the glorious ascendancy of the foremost conqueror, the one who triumphs over the daunting Tier 100 Nightmare dungeons in the realm of gaming! Within this compendium of enlightenment, we shall embark on a grand expedition through the refined incarnation of the spellbinding Exploding Shadow Mist Necromancer. This remarkable being, hailed as the “Infinimist” or the “Shadowblight Stacker”, shall guide us towards unparalleled greatness.
Be mindful that this particular build relies heavily on the gear you possess, making it essential to have a few specific items for it to work effectively. In order for this build to function optimally, you will need the Howl from Below Unique gloves, along with various Cooldown Reduction modifiers on your Amulet, Helmet, and Focus. Additionally, it is crucial to have % Increased Lucky Hit Chance on each available piece of equipment.
Theoretically, one can engage in the gameplay without the Exceptional gloves, yet it inevitably leads to an abundance of exasperating instances. This is due to the reliance on Corpse Explosion, which necessitates the presence of corpses beneath adversaries. The gloves, however, enable us to detonate corpses from a greater distance, causing them to sprint towards the intended target and detonate upon reaching them.
In case you are unable to acquire such exquisite gears or the exceptional gloves, we highly advocate exploring the Blight Shadowmancer Necromancer build as an alternative. This build provides a pathway for you to gradually ascend and eventually indulge in the delights of this particular playstyle.
Input: Have any queries or suggestions about this guide? Join the livestream and feel free to ask me anything!
Video Guide
Strength.
Weaknesses.
Skill Tree Points
| Priority Skills | Cluster |
|---|---|
| Reap, Enhanced Reap | Basic Skill |
| Blight, Enhanced Blight, Paranormal Blight, Hewed Flesh Level 3 | Core Skill |
| Corpse Explosion, Enhanced Corpse Explosion, Blighted Corpse Explosion, Blood Mist, Enhanced Blood Mist, Ghastly Blood Mist, Grim Harvest, Fueled by Death Level 3 |  Corpse & Macabre Skill Corpse & Macabre Skill |
| Death’s Embrace Level 3, Amplify Damage Level 3, Decrepify, Enhanced Decrepify, Abhorrent Decrepify | Curse Skill |
| Corpse Tendrils, Enhanced Corpse Tendrils, Plagued Corpse Tendrils, Reaper’s Pursuit Level 3, Crippling Darkness, Gloom Level 3, Terror Level 3 | Summoning Skill |
| Bone Storm, Prime Bone Storm, Supreme Bone Storm, Stand Alone Level 3, Memento Mori | Ultimate Skill |
| Shadowblight | Key Passives |
| Remaining Renown Points | Cluster |
|---|---|
| Corpse Explosion Level 5, Blood Mist Level 5 | Corpse & Macabre Skill |
| Memento Mori Level 3 | Ultimate Skill |
Book of the Dead
Embracing the art of inflicting relentless havoc through our shadow abilities, we wholeheartedly dismiss the notion of utilizing our minions, as they shall be willingly offered as sacrifices in honor of Lilith.
Paragon Board
Upon reaching level 50, the Paragon progression system comes alive, bestowing upon characters an immense reservoir of power. Within the Paragon Board, an array of bonuses await, spanning from modest enhancements found in Magic Nodes to the potent allure of Rare Glyphs and Legendary Nodes.
As you embark on your journey towards Glyph Sockets and Legendary Nodes, it is crucial to prioritize Damage, Intelligence, Resistance, and Life for Normal and Magic Nodes. The radius of the Glyph expands as you advance its level. Hence, if you are unable to meet the requirements for Additional Bonus initially, it might be wise to postpone allocating extra nodes for the time being. It is worth noting that you may not obtain the desired Glyph when you unlock your first socket. In such cases, temporarily slotting in any Glyph that offers beneficial stats can be a suitable alternative until you acquire the correct one.
Presented here are captivating visuals illustrating the precise path you ought to tread, adorned with the enchanting Glyphs and a carefully curated sequence for selecting your Paragon Boards beyond the inaugural starting board.
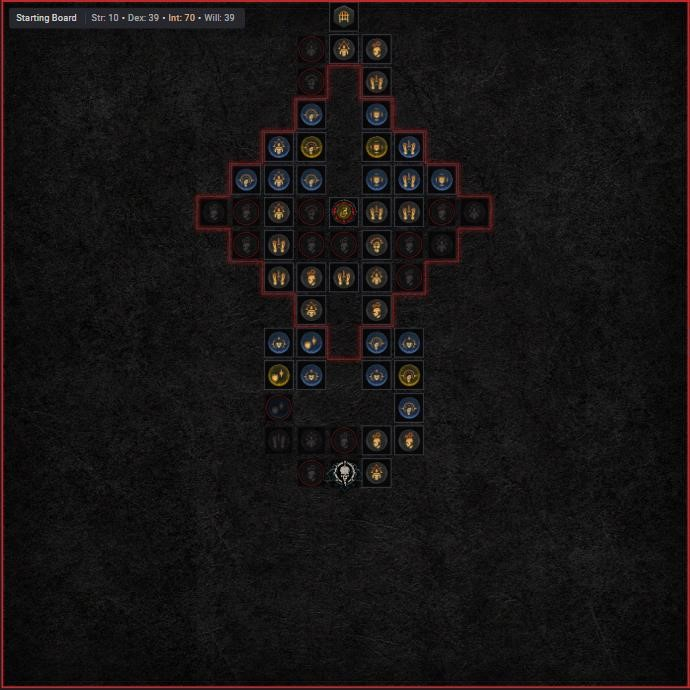
The Starting Board is very straightforward: we want all Magic nodes in the end, except for that scrappy resistance one on the left. You’ll want to focus on picking up the Rare nodes and only taking the extra pathing to fulfill the desired attributes required to benefit from the Additional Bonus modifier of the  Territorial Glyph when it’s high enough level to achieve that. Any extra attribute nodes should be ignored unless they serve the purpose of that.

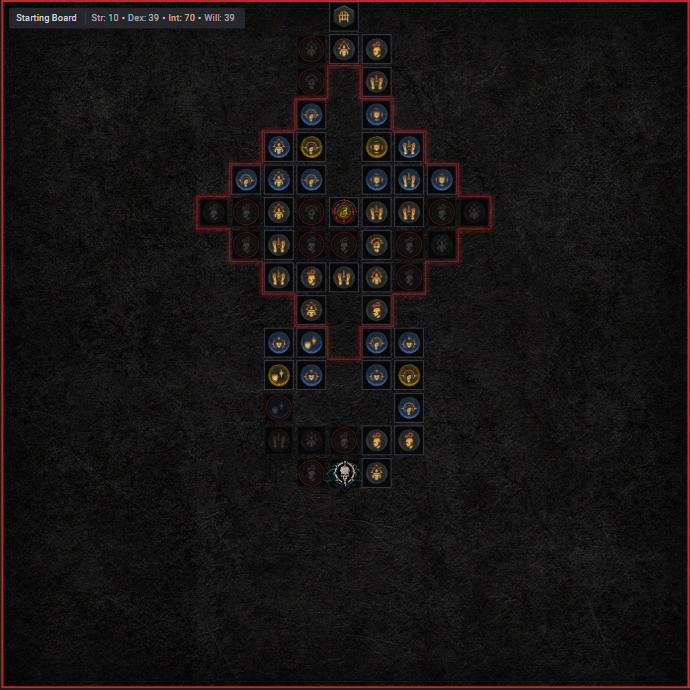
The second board should be the Wither board. Make sure to rotate it to fit the image above. The first thing we’ll want to do here is grab the socket and put in the  Scourge Glyph. Similar to our Starting Board, we’ll only take the extra attributes if they are within radius and can fulfill the Additional Bonus requirement of the Glyph. Before heading north, we’ll want to rush the Wither Legendary Node.
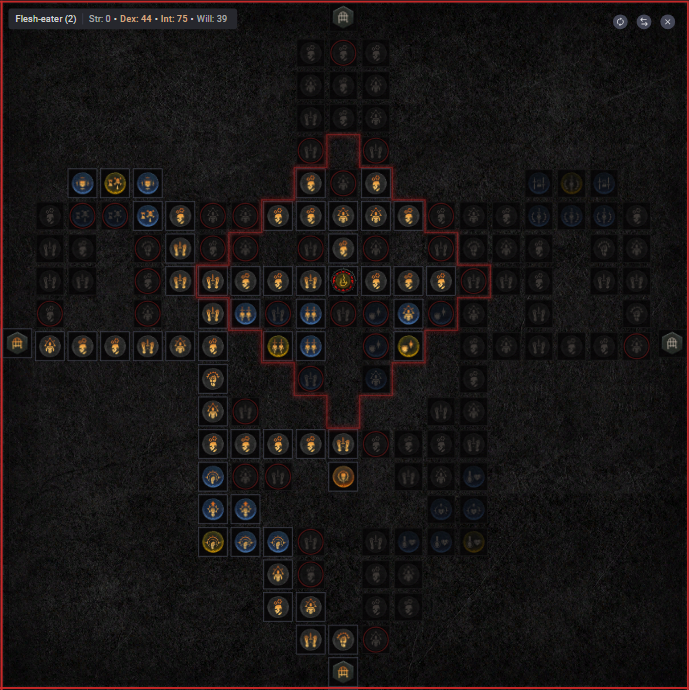
Our third board is the Flesh-Eater board. In here we want to rush the Legendary node. Once that’s achieved, you’ll head towards the socket and put in the  Control Glyph. Same story as per usual, don’t take the extra attributes unless the Glyph level is high enough to cover the required attributes within range! Next up we skip the Rare and Magic nodes on the top left-corner and instead save them for our last paragon points, as it is more important to head down south for our fourth and final board.
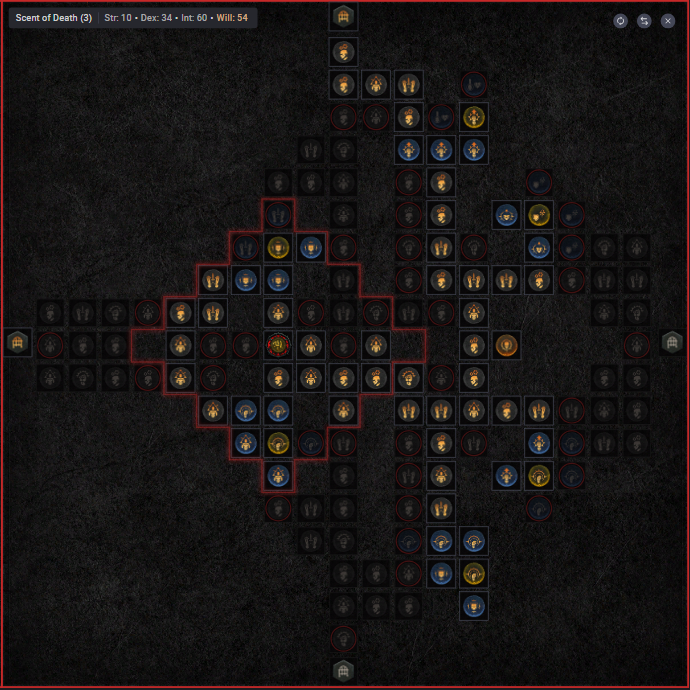
The fourth and final board is Scent of Death. This one is slightly different compared to our previous boards, as we will first want to rush to the socket and put in a Darkness Glyph and as per usual only take the extra attributes if the Glyph level allows for it within its radius. However, by rushing down to the socket like that you are now pathing “incorrectly”; this is solved by heading straight to the Legendary node and then connect your pathing up north so you can safely remove the 5 points you invested to rush to the socket in the first place. Once this is completed, you’ll fill out any attributes nodes across your boards as well as getting the remaining Magic and Rare nodes!
Input: Paragon board images courtesy of d4builds.Gg.The mesmerizing Paragon board images, generously provided by d4builds.Gg.
Mechanics and Playstyle
In this build, fortune favors the skillful strikes. Your approach to playing the build will vary based on the level of difficulty, your character’s level, and the equipment you possess. Let’s begin by exploring the initial strategy for reaching the end-game.
As long as you’re not getting instantly obliterated by foes (typically at Tier 50-60 Nightmare dungeons, where this strategy is anticipated to function flawlessly), adhere to the following priority list for your rotation:
The rotation showcased above serves its purpose when dealing with larger hordes of adversaries. In the event that you come across smaller groups that are not essential for advancing through the dungeon, your aim should be to include them in your journey to the next group and only eliminate them if they directly endanger you. This particular build may not excel in single-target damage, but it excels as a swift and efficient force, effortlessly clearing obstacles with finesse.
When focusing on a single target, the rotation becomes significantly simpler. Instead of constantly plunging into Blood Mist, you have the freedom to incorporate manually casted Corpse Explosions and gracefully maneuver around the target until it meets its demise.
As you delve into the realms of the ultra-luxurious Tiers of Nightmare dungeons, ranging from level 60 to 100, the gameplay rotation takes on a surprisingly effortless yet cunningly intricate quality. The adversaries now emerge as formidable foes, presenting an immense and immediate danger. The act of luring smaller groups of enemies towards a larger one is no longer a simple task, and in certain instances, it may prove to be quite challenging, if not entirely impossible.
Ensuring the constant presence of Decrepify and diving into the crimson haze of Blood Mist should be your utmost focus, embracing the opportunity with unwavering enthusiasm.
Gear Choice and Stat Priority
Input: As we fervently seek maximum Luck Hit Chance and Cooldown Reduction enhancements, there exists a selection of extraordinary items at our disposal. The following slots are highly recommended, along with a compilation of alternative powers to substitute for the suggested unique items.
Here is a comprehensive guide on the top-notch enhancements to focus on when equipping the Exploding Shadow Mist Necromancer. Each gear slot has been meticulously arranged in descending order of significance. The highlighted attributes are of utmost importance, often serving as the backbone for the build’s seamless operation.
| Gear Slot | Important Affixes |
|---|---|
| 1H Wand | + Vulnerable Damage + Critical Strike Damage + Intelligence + Willpower + Damage to affected by Shadow Damage over Time Enemies + Damage to Close Enemies + Damage Over Time |
| Focus (Offhand) | + Lucky Hit Chance + Cooldown Reduction + Intelligence + Willpower |
| Helm | + Cooldown Reduction + Armor + Intelligence + Willpower + Life |
| Chest | + Armor + Damage reduction from Close Enemies + Damage reduction from Affected by Shadow Damage Over Time Enemies + Damage reduction + Life |
| Pants | + Ranks of Corpse Explosion + Damage reduction from Close Enemies + Damage reduction from Affected by Shadow Damage Over Time Enemies + Armor + Damage Reduction |
| Boots | + Movement Speed + Movement Speed for X Seconds After Killing an Elite + Intelligence + Willpower + All Attributes |
| Amulet | + Cooldown Reduction + Movement Speed + Ranks of either; Fueled By Death, Amplify, Gloom or Terror + Ranks of all Corpse Skills |
| Rings | + Lucky Hit Chance + Life + Shadow Damage + Damage to Close Enemies + Intelligence + Willpower |
Legendary Aspects and Uniques
Below, you will find a comprehensive compilation of the highly recommended Legendary Aspects crucial for the construction of the formidable Exploding Shadow Mist Necromancer build. These exceptional Aspects can be sourced either from the esteemed Codex of Power or acquired through the discovery of Legendary Items. However, it is worth noting that the Aspects hailing from the Codex of Power, while still viable in the absence of suitable Legendary drops, may possess comparatively lesser potency.
| Gear Slot | Aspect Name | Aspect Power |
|---|---|---|
| Helm | Aspect of Explosive Mist | Blood Mist triggers Corpse Explosion on surrounding Corpses. When Blood Mist detonates a Corpse, its Cooldown is reduced by 0.2-0.5 seconds. |
| Chest | Aspect of Disobedience | You gain 0.25-0.5% increased Armor for 4 seconds when you deal any form of damage, stacking up to 25-50% |
| Pants | Aspect of Shielding Storm | Each time that Bone Storm damages an enemy, gain a BArrier equal to 2-5% of your Base Life for 10 seconds. |
| Boots | Ghostwalker Aspect | While Unstoppable and for 4 seconds after, you gain 10-25% increased Movement Speed and can move freely through enemies. |
| Weapon | Conceited Aspect | Deal 15-25% increased damage while you have a Barrier active. |
| Amulet (50% scaling) | Blighted Aspect | You deal 50-120% increased damage for 6 seconds after the Shadowblight Key Passive damages enemies 10 times. |
| Ring | Blood-soaked Aspect | Blood Mist leaves a trail that lasts for 4 seconds and deals X Shadow damage per second to enemies who stand in it. Your Movement Speed is no longer reduced while Blood Mist is active. |
| Ring | Aspect of Ultimate Shadow | Bone Storm and Blood Wave are also Darkness Skills, deal Shadow damage, and gain additional effects: Enemies damaged by Bone Storm take X Shadow Damage over 2 seconds. Blood Wave desecrates the ground it travels over, dealing X Shadow damage over 4 seconds. |
| Offhand | Aspect of Decay | Each time the Shadowblight Key Passive deals damage to enemies, it increases the next Shadowblight’s damage within 10 seconds by 20-40%, stacking up to 5 times. |
Unique Items
Although it may not be an absolute requirement, we hold a strong conviction that the absence of Howl from Below gloves would undoubtedly lead to a subpar encounter with this particular build. There exists a small selection of alternatives that perform exceptionally in this build and could even be deemed as the ultimate choice. Presented below is a compilation of these remarkable items:
Gems
Behold, presented below are the most exquisite Gems awaiting to be delicately nestled into the very core of your gear, tailored meticulously for each slot type.
Elixirs and Health Potions
Venture into the realm of possibilities by making your way to the enigmatic Alchemist residing in the mystical town of Kyovashad. Unleash your creativity by concocting powerful Elixirs that have the ability to amplify your abilities and accelerate your progress for a mesmerizing duration of 30 minutes. Don’t forget to embark on a thrilling quest to gather the essential ingredients from the untamed wilderness. Choose an Elixir that perfectly aligns with your desires, granting you unparalleled resistance or dare to embrace the exhilarating power of the Weak Assault Elixir, magnifying your Attack Speed by an astonishing 7%.
Revisit the Alchemist upon reaching the milestones of level 20 and 30, where you can enhance your potion. The augmented healing potency holds utmost significance for your survival.
In order to ensure victory in the final battle, it is crucial to possess the most potent health elixir and an active potion that enhances experience acquisition. This combination not only offsets any vulnerabilities but also amplifies attack rate, thereby maximizing damage potential.