Game
How to Allocate More RAM to Minecraft Launchers | Minecraft | Knowledgebase Article
It is crucial to have an ample amount of RAM to ensure optimal performance and prevent game crashes for different versions of Minecraft, including both vanilla and modded versions. This article will delve into the techniques of allocating additional RAM to frequently utilized Launchers.
Launch the Launcher and confirm that you are in the Java Edition section of the launcher.
Click on the installations tab and find which installation you want to allocate more RAM to.
Click on the installations tab and find which installation you want to allocate more RAM to.
Hover over the installation you want to allocate more RAM to and click on the more options (3-dot menu) and click on edit.

Click on the More Options text.

Change the number after the argument -Xmx to allocate more RAM. (i.e. -Xmx1G = 1GB of RAM, -Xmx6G = 6GB of RAM etc.)

ATLauncher offers users two distinct methods for allocating RAM. The initial approach allows for setting the default RAM across all instances, while the second method permits the customization of RAM allocation for specific instances.
Setting the Default RAM Allocation for All Instances
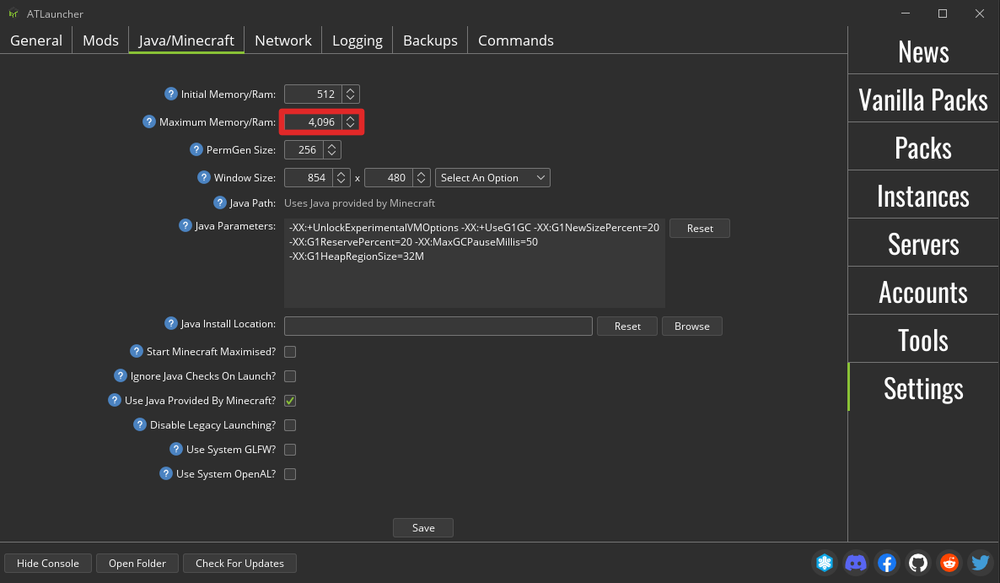
Click on the Settings option located on the sidebar.
Click the Java/Minecraft tab.

Change the Maximum Memory/Ram option to allocate more RAM as the default for all ATLauncher instances. Note that this option is in Megabytes, a Gigabyte is approximately 1024 Megabytes (i.e. 1GB = 1024MB, 4GB = 4096MB, etc.)
Allocating RAM to an Individual Instance
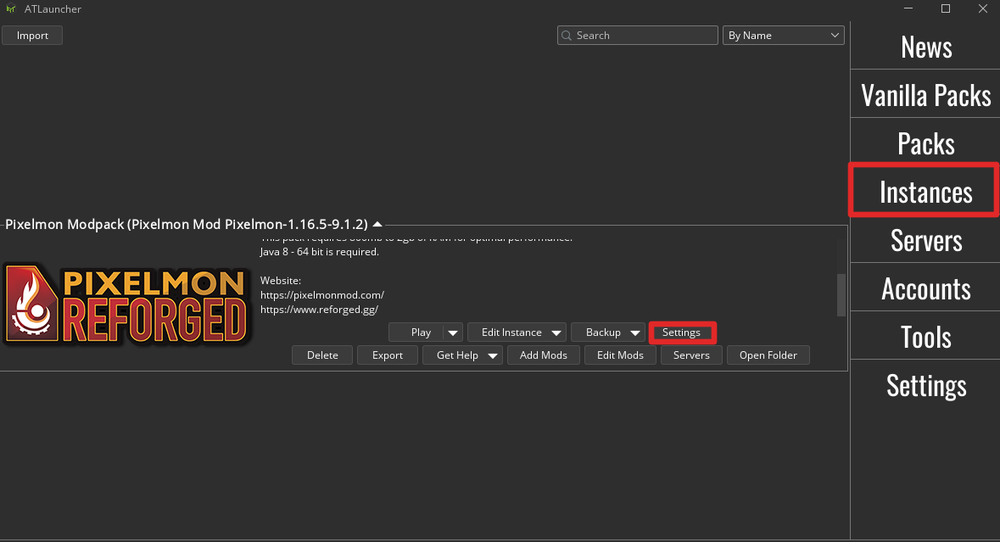
Click on “Instances” in the side panel.
Click on the settings button for the instance you want to allocate more RAM to.
Click on the Java/Minecraft Preferences section.
Change the Maximum Memory/Ram option to allocate more RAM as the default for all ATLauncher instances. Note that this option is in Megabytes, a Gigabyte is approximately 1024 Megabytes. (i.e. 1GB = 1024MB, 4GB = 4096MB etc.)

Curseforge offers a duo of RAM allocation methods. The initial approach involves configuring the launcher’s default RAM, which acts as a universal setting for all profiles unless overridden by individual profile preferences. Alternatively, one can assign RAM to a particular profile through the profile settings.
Allocating RAM in the General Settings
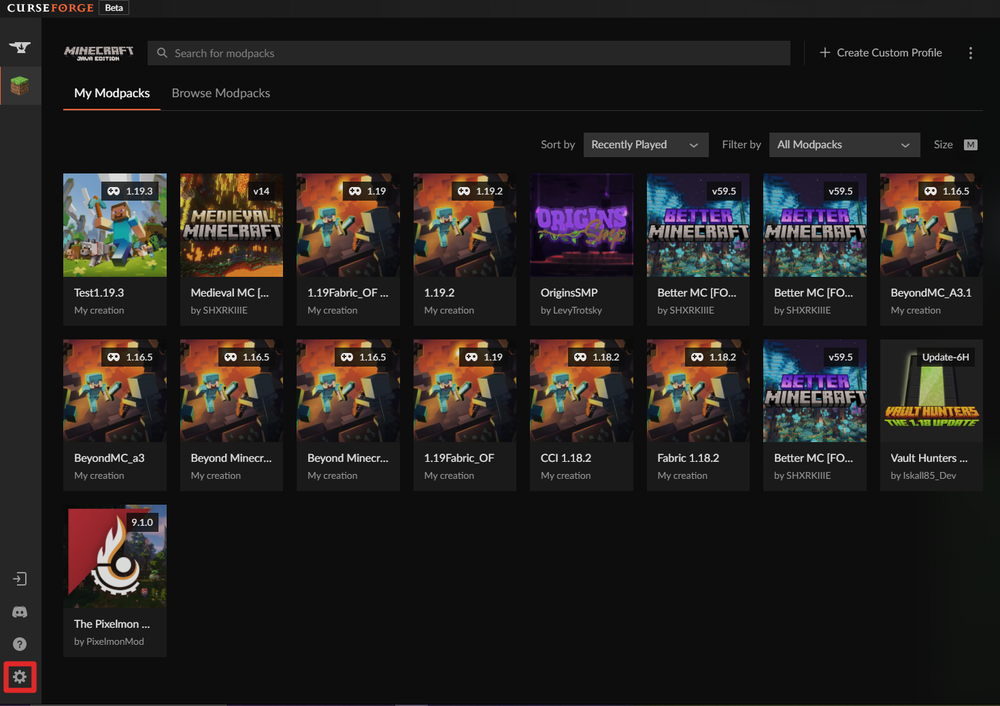
Click the gear icon in the lower left to open the settings.
In the settings menu, select Minecraft under Game Specific Settings.
Scroll down to locate the Allocated Memory slider beneath the Java Settings.
Move the Slider to allocate RAM. The slider is in megabytes, a gigabyte is approximately 1024 megabytes. (i.e. 1GB = 1024MB, 4GB = 4096MB etc.)

Allocating more RAM to a Specific Profile
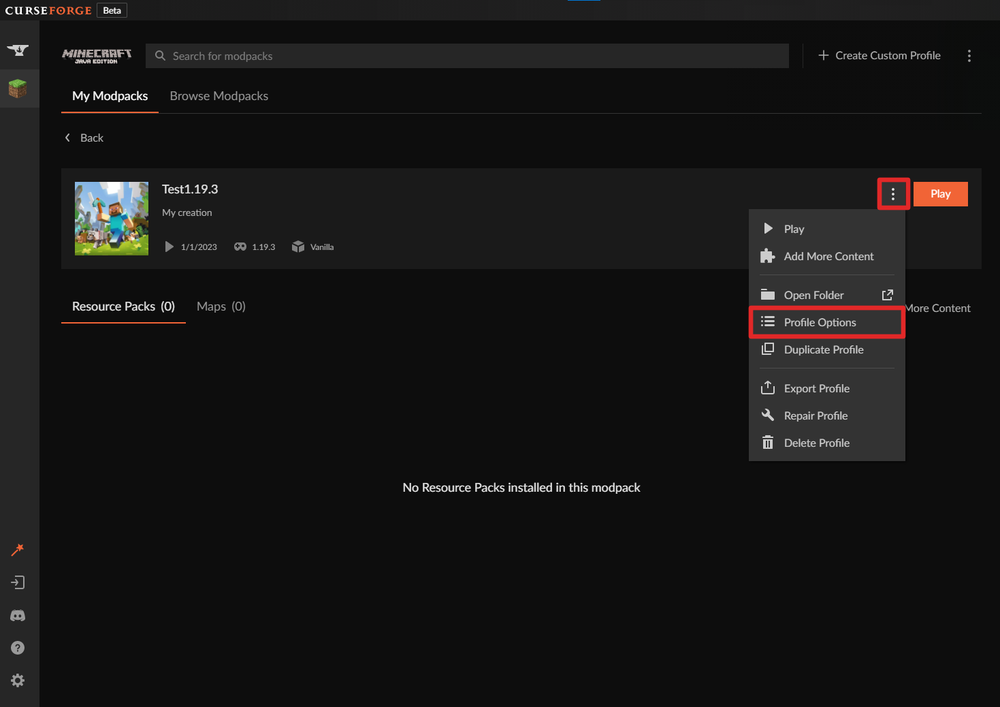
Navigate to the My Modpacks category in the CurseForge launcher.
Click on anywhere on the profile tile you want to select except for the play button.
Open the 3-dot options menu next to the play button and click on “Profile Options”.
Deselect the box for utilizing system memory settings.
Move the Slider to allocate RAM. The slider is in megabytes, a gigabyte is approximately 1024 megabytes. (i.e. 1GB = 1024MB, 4GB = 4096MB etc.)

Access the Library category within the FTB application.
Hover over an installation and click anywhere on that installation except the play button.

On the following screen, click on settings.

Move the Slider to allocate RAM.

In the top right corner, click on Launcher Options.

Select Java Preferences.
Use the Memory dropdown to select how much RAM to allocate.

To allocate more memory to a specific instance, simply right-click on it.
Click Edit Instance.

Click on the Settings option.
Please tick the box adjacent to Memory.
Change the value for Maximum Memory Allocation to allocate more RAM.

Click the options symbol in the upper right corner.