Diablo
Mendeln Summoner Necromancer Endgame Build for Diablo 4
Jul
Behold the grand finale of the Summoner Necromancer build, an exquisite concoction that demands the awe-inspiring Ring of Mendeln to thrive. This extraordinary ensemble has been meticulously crafted with the sole purpose of harnessing the ring’s extraordinary powers.
Although capable of conquering Tier 100 Nightmare Dungeon and emerging victorious against Uber Lilith, it must be emphasized that it falls short of being the ultimate choice for either of these endeavors. Currently, the most optimal Necromancer build for defeating Uber Lilith is the mighty Bone Spear, while our explosive Shadowmist build reigns supreme for conquering Tier 100 Nightmare Dungeons.
Before we embark on the intricacies, let me emphasize that this particular build reigns supreme as the ultimate summoner build for the Necromancer. Yet, it’s crucial to note that the Ring of Mendeln shoulders the entire burden of inflicting damage. In other words, the onus lies solely on you, the player, rather than your loyal Skeletal Minions.
Video Guide
Strengths.
Weaknesses.
Skill Tree Points
| Priority Skills | Cluster |
|---|---|
| Decompose Level 2 | Basic Skill |
| Blight, Enhanced Blight, Supernatural Blight, Hewed Flesh Level 3 | Core Skill |
| Blood Mist, Enhanced Blood Mist, Ghastly Blood Mist, Skeletal Warrior Mastery Level 3, Corpse Explosion, Enhanced Corpse Explosion, Blighted Corpse Explosion, Bone Prison, Enhanced Bone Prison, Ghastly Bone Prison, Grim Harvest, Fueled by Death Level 3 |  Corpse & Macabre Skill Corpse & Macabre Skill |
| Decrepify, Enhanced Decrepify, Abhorrent Decrepify, Death’s Embrace Level 3, Skeletal Mage Mastery Level 3 | Curse Skill |
| Corpse Tendrils, Enhanced Corpse Tendrils, Plagued Corpse Tendrils, Reaper’s Pursuit Level 3 | Summoning Skill |
| Bone Storm, Prime Bone Storm, Supreme Bone Storm, Bonded in Essence Level 2, Death’s Defense Level 3 | Ultimate Skill |
| Shadowblight | Key Passives |
| Remaining Renown Points | Cluster |
|---|---|
| Blood Mist Level 3 | Corpse & Macabre Skill |
| Amplify Damage Level 3 | Curse Skill |
| Necrotic Carapace Level 3, Crippling Darkness | Summoning Skill |
| Bonded in Essence Level 3 | Ultimate Skill |
Book of the Dead
As we delve into the realm of a truly Minion-centric build, let us harness the prowess of our loyal Minions instead of relinquishing them. Alas, the Golem’s might falls short in meeting our requirements for additional abilities, leaving us yearning for more formidable forces.
Paragon
As you reach level 50, the Paragon progression system springs to life, bestowing an abundance of character empowerment. Within the Paragon Board, a plethora of bonuses await, spanning from inconspicuous enhancements on the enchanting Magic Nodes to the awe-inspiring might of Rare Glyphs and Legendary Nodes.
As you journey towards Glyph Sockets and Legendary Nodes, it is crucial to prioritize Damage, Intelligence, and Life for Normal and Magic Nodes. The radius of Glyphs expands as their levels increase. Hence, if you are unable to meet the requirements for Additional Bonuses at the beginning, it is advisable to postpone allocating extra nodes for the time being. It is worth noting that you may not have the desired Glyph when you reach your initial socket. In such a scenario, you can temporarily insert any Glyph that offers advantageous statistics until you obtain the correct one.
Here are images showcasing the recommended pathing, Glyph locations, and the order in which you should choose your Paragon Boards beyond the initial starting board. It’s crucial to note that maintaining the minions’ survival is essential for the success of this build. To achieve this, we will utilize the “Cult Leader” board as our sixth and final board, utilizing the Deadraiser Glyph to enhance the effectiveness of damage reduction nodes for the minions. Given the significance of this board, it is advisable to prioritize placing it early on in the progression of your character, rather than the “Flesh-eater” board. As you advance and reach higher levels, you can later switch the positions of these two boards.
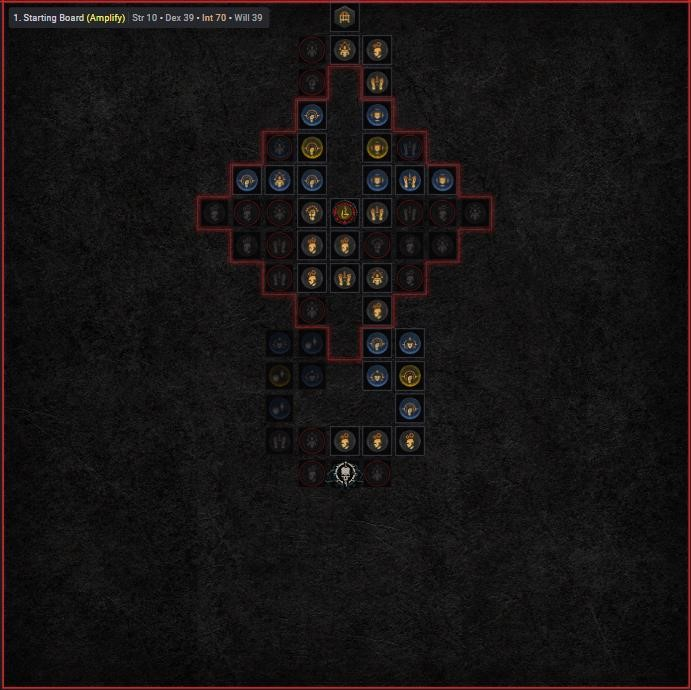
Starting Board
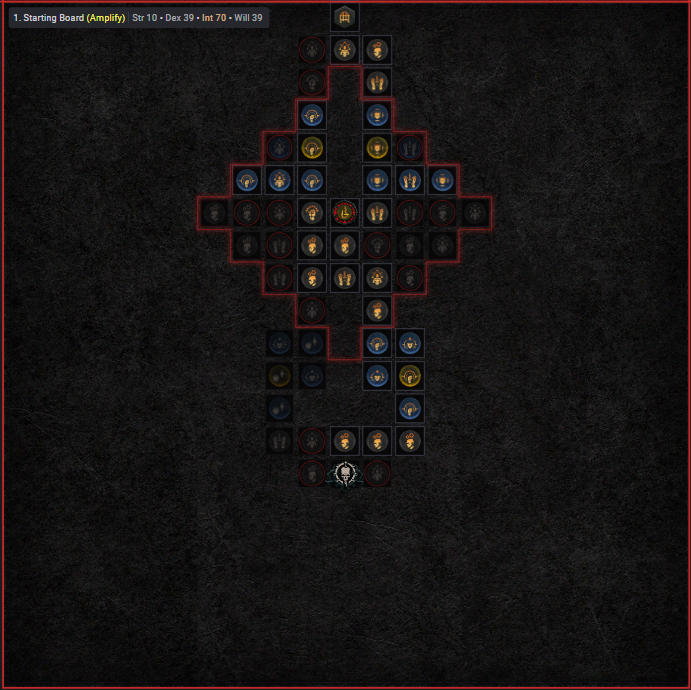
Embarking on the journey, we shall swiftly advance along the right-hand side of the Starting Board, locating the perfect socket to house the mighty Amplify Glyph. It is crucial to seize any additional attributes within the vicinity to attain the advantageous bonus modifier bestowed by the Glyph, should it be within reach. As the Glyph gains strength through the challenges of Nightmare Dungeons, the radius of influence shall progressively expand. Our path shall then lead us towards the northern expanse, to conquer the next board that awaits.
Scent of Death (2nd Board)
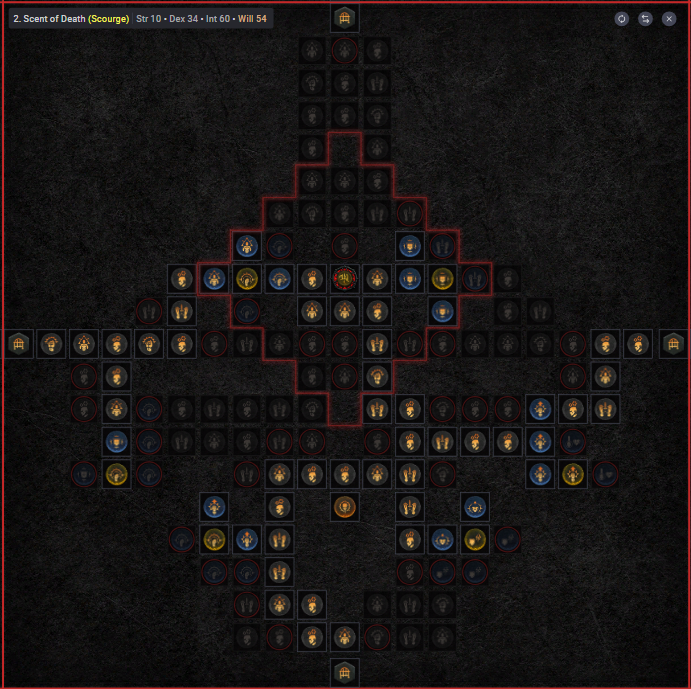
Our second Board is the Enigmatic Fragrance Legendary Board. Keep in mind that, to align with the visual presented above, you might have to rotate the Paragon Boards. Within this Board, our initial objective will be to swiftly progress through the Legendary Node known as Scent of Death, prior to acquiring the Magic and Rare nodes along our path towards the socket. It is within this socket that we shall carefully position the Scourge Glyph. Similar to the Starting Board, if possible, seize the additional attributes within its radius to maximize the bonus modifier from the Glyph. Once this is accomplished, we will momentarily venture towards the left side to obtain our third Board, known as Flesh-eater, before returning and making our exit through the right-hand side to enter the Wither Board.
Flesh-eater (3rd Board)
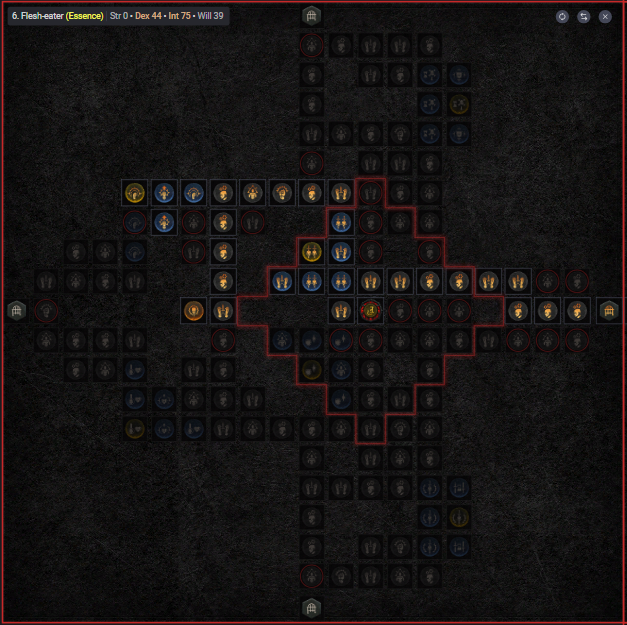
With utmost haste, we shall embark upon the third board known as Flesh-eater, where our primary objective is to swiftly position the Essence Glyph within its designated socket. As has been our custom, let us seize any additional attributes that may be obtained through the expansion of the Glyph’s radius and level, thus enabling the activation of the coveted bonus modifier. Following this endeavor, it is imperative that we proceed to acquire the Legendary Node known as Flesh-eater, accompanied by the surrounding Magic and Rare Nodes. Upon successful completion, we shall redirect our course towards our second Board, Scent of Death, and commence our journey from the rightward direction.
Wither (4th Board)
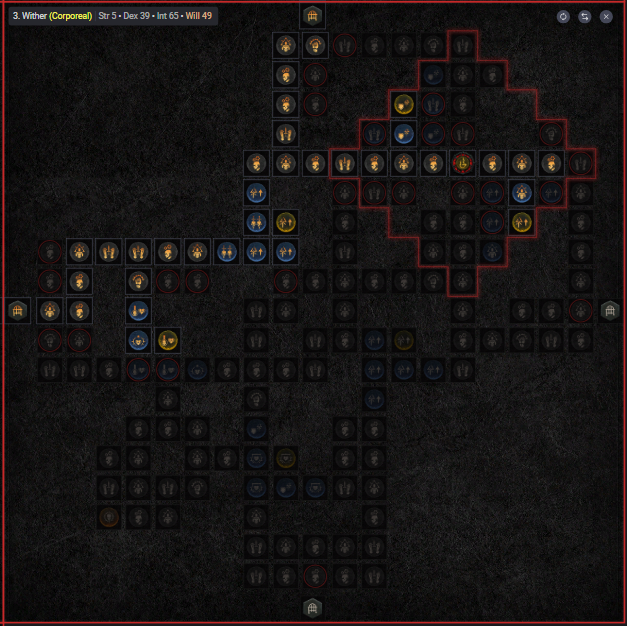
Withering, like a flesh-devourer, you shall seize the enigmatic Magic and Rare nodes that lie in our path towards the socket where the Corporeal Glyph awaits. Only claim the supplementary attributes and nodes surrounding this glyph if your skill level permits the activation of the enhanced modifier. If not, you may bypass the socket and its vicinity altogether, ascending towards the summit instead, as both routes lead to the same destination.
Bloodbath (5th Board)
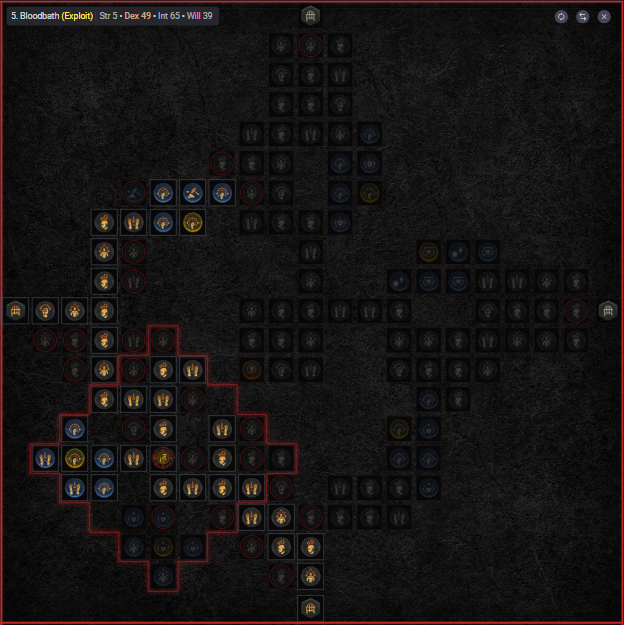
Embark on a Bloodbath adventure by seizing the nearby Magic and Rare items depicted in the image. Begin by securing the socket and promptly affixing the Exploit Glyph. Seek out additional attributes in close proximity to activate the bonus modifier, giving utmost importance to any Dexterity nodes residing within the Glyph radius to maximize our damage potential. Upon completion, proceed towards the left side, leading us to our ultimate destination on the Paragon Board.
Cult Leader (6th Board)
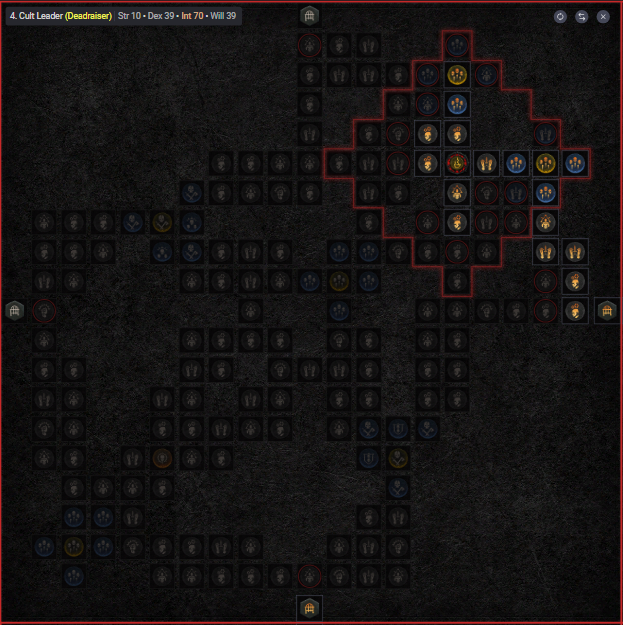
The Cult Leader serves as the lifeblood for our loyal Minions, ensuring their survival and prosperity. Our sole purpose for acquiring this board is to seize the coveted Damage Reduction Nodes, which, when paired with the potent Deadraiser Glyph, enhance and amplify those modifiers to extraordinary heights.
The mesmerizing visuals of Paragon board images are generously provided by d4builds.Gg.
Mechanics and Playstyle
Gear Choice and Stat Priority
The success of this build heavily relies on the presence of Lucky Hit, while simultaneously desiring an abundance of Critical Strike Chance. Our objective is to reach a 100% chance of landing critical strikes, accomplished by harnessing the power of our Aspect abilities and the added Critical Strike Chance provided by the Supreme Bone Storm. The Mendeln Summoner build guarantees a rapid cooldown rate through well-timed Lucky Hits, allowing for a consistent application of Vulnerable status onto enemies via Decrepify. As a result, stacking Vulnerable damage becomes the optimal choice for maximizing the build’s potential.
Here are the Affixes to focus on when selecting gear for the Mendeln Summoner Necromancer. The importance of each affix varies depending on the gear slot. Pay special attention to the bolded stats as they are crucial for the build’s optimal performance.
| Gear Slot | Important Affixes |
|---|---|
| 1H Wand | + Vulnerable Damage + Critical Strike Damage + Intelligence + All Attributes + Damage to Close Enemies + Damage to Enemies affected by shadow damage over time |
| Focus (Offhand) | + Lucky Hit Chance + Cooldown Reduction + Critical Strike Chance + Intelligence + All Attributes |
| Helm | + Cooldown Reduction + Lucky Hit Chance While You Have A Barrier (This can be enchanted at the Occultist by having a Sorcerer do it for you or if you level one to roll the gear yourself of course) + Armor + Life |
| Chest | + Armor + Life + Damage reduction to Close Enemies + Damage reduction to Enemies affected by Shadow Damage over time |
| Gloves | + Lucky Hit Chance + Critical Strike Chance + Intelligence + All Attributes |
| Pants | + Ranks of Blood Mist + Armor + Life + Damage reduction to Close Enemies + Damage reduction to Enemies affected by Shadow Damage over time |
| Boots | + Movement Speed + Ranks of Corpse Tendrils + Intelligence + All Attributes + Movement Speed when you’ve killed an elite |
| Amulet | + Ranks of Amplify + Movement Speed + Cooldown Reduction + Intelligence + All Attributes |
| Ring | + Lucky Hit Chance + Critical Strike Chance + Critical Strike Damage + Vulnerable Damage |
Legendary Aspects
Below, you will find a comprehensive compilation of the esteemed Legendary Aspects that come highly recommended for the Mendeln Summoner Necromancer build. These remarkable Aspects can either be discovered within the legendary items themselves or sourced from the esteemed Codex of Power. Should you face difficulty in procuring the desired Legendary drops, fret not, for the Aspects found within the Codex can serve as a substitute, albeit with slightly diminished potency.
| Gear Slot | Aspect Name | Aspect Power |
| Helm | Aspect of Explosive Mist | Blood Mist triggers Corpse Explosion on surrounding Corpses. When Blood Mist detonates a Corpse, its Cooldown is reduced by 0.2-0.5 seconds. |
| Chest | Aspect of Disobedience | You gain 0.25-0.5% increased Armor for 4 seconds when you deal any form of damage, stacking up to 25-50%. |
| Gloves | Blood Getter’s Aspect | Your maximum number of Skeletal Warriors is increased by 2. |
| Pants | Aspect of Shielding Storm | Each time that Bone Storm damages an enemy, gain a Barrier equal to 2-5% of your Base Life for 10 seconds. |
| Boots | Viscous Aspect | Your maximum number of Skeletal Mages is increased by 2. |
| 1H Weapon | Conceited Aspect | Deal 15-25% increased damage while you have a Barrier active. |
| Amulet (50% scaling) | Aspect of Grasping Veins | Gain 10-20% increased Critical Strike Chance for 6 seconds when you cast Corpse Tendrils. You deal 30-60% bonus Critical Strike Damage to enemies damaged by Corpse Tendrils. |
| Ring | Blighted Aspect | You deal 50-120% increased damage for 6 seconds after the Shadowblight Key Passive damages enemies 10 times. |
| Offhand | Aspect of Plunging Darkness | Bone Prison spawns a pool of Blight that deals 50-100% bonus damage for 6 seconds. |
Unique Items
Input: The Mendeln Ring possesses a distinctive power: When you possess a minimum of 7 Minions, you unlock the ability to potentially strengthen all of them. This enhancement grants them a captivating chance of up to 10% to trigger an explosive surge of [X] Physical damage with their subsequent attacks.
The Ring of Mendeln is the one-of-a-kind artifact that we absolutely must incorporate. Our entire creation revolves around this enchanting ring, rendering its inclusion indispensable for the optimal functioning of our design.
Gems
Discover the ultimate collection of precious Gems to delicately embed into your gear, specifically curated for every distinct slot type.
Elixirs and Health Potions
Embark on a thrilling quest to gain an advantage in your epic adventures. Seek out the enigmatic Alchemist nestled in the mystical realm of Kyovashad, where you can master the art of concocting extraordinary Elixirs. These magical potions hold the power to elevate your stats and amplify your experience for a glorious half hour. But first, embark on a daring quest to gather the essential ingredients by exploring the untamed wilderness and foraging for rare and exotic plants. Once equipped with the coveted crafting materials, carefully select an Elixir that aligns with your utmost desires. Perhaps you seek impenetrable defenses? Choose an Elixir that grants you unparalleled resistance. Or maybe you crave an adrenaline-fueled frenzy? In that case, indulge in the tantalizing allure of the Weak Assault Elixir, which bestows upon you a breathtaking 7% boost to your Attack Speed. The choice is yours, brave adventurer, as you navigate the realm of possibilities and shape your
Once you attain levels 20 and 30, make your way back to the Alchemist for an enchanting encounter. Enhancing your potion becomes a paramount task, as the additional healing it provides is crucial for your very existence.
To ensure victory in the final battle, it is crucial to possess the utmost potent health elixir and a vibrant potion that enhances your expertise, granting amplified experience. Additionally, this elixir can either rectify any weaknesses or amplify your offensive capabilities in terms of attack speed.